
Four boards, 12 screws and a bit of wood glue to this gorgeous DIY console table / DIY sofa table / DIY entryway table – inspiration pieces are selling for over $1,600 US!
I’ve been sitting in front of my computer for hours – literally HOURS!
My F*&%ing iMac is working at a snail’s pace again and my photos are all locked up. I only bought this computer in 2019 (although it is a 2017 model – I don’t know how that happened?) so it really shouldn’t be this horrible already? I guess it needs a new hard drive or something, but I am very close to throwing it through the window altogether.
Okay, rage vented.
Now on to something kinda awesome… the four board DIY console table I built for my bedroom.
Actually, I built two – the first one wasn’t “girthy” enough to go with my bed, so I decided to build a second DIY sofa table with thicker wood to get a more consistent look.
DIY console table
You will need:
- (1) 2″ x 12″ x 6′.
- (1) 2″ x 12″ x 8′
- mitre saw
- pocket hole jig
- 2″ pocket hole screws
- wood glue
- sander & sandpaper
- stain/paint/poly
Cut list:
Before cutting, layout your pieces so that you maximize your wood use. There is very little wasted wood, IF you plan before you cut.
- (1) board cut to 54″ long
- (2) boards cut to 32″ long with a 10° PARALELL bevel on either end
- (1) board cut to 44 ¼” long with a 10° bevel running opposite to each other. The 44 ¼” measurement is from the long side.
Begin your four-board console table by drilling 3 pocket holes into one end of your 32″ boards. Rest your board against the table top (54″ piece) to ensure that you are drilling pocket holes in the correct side of the board (so the screw holes are hidden) and so that the legs splay outward from the top.
The photo below is of my build that used ¾” wood (the version of my DIY sofa table that I didn’t keep). Your boards will line up flush with the top board and not inset.

I wanted the legs to splay out from the top, but not spread so far past the top that they were outside of the 54″ overall width. I marked 8″ in from the outer edges of the top board (which is upside down here), applied wood glue and then used 2″ pocket screws to attach.

Again, your legs won’t be inset if you are using the 2″x12″ boards for all the pieces.
Repeat on the other side:

I was re-using ¾” boards from a shoe rack I dismantled, so ignore the pocket holes you see on the right there – they were not from this project.
While your glue is setting, drill 3 pocket holes in either end of your 44″ board. Drill them on either end of the LONG side since this will be the part facing the floor.

Mark your legs up ~4″ from the ground and attach your bottom shelf using 2″ pocket screws.
I attached one screw on one end, then used a level (while the DIY console table was upside down) to make sure that the other side was perfectly flat length-wise and width-wise. Drill in the remaining screws.

I was torn on this version of my four-board console table…
I wasn’t sure if I liked the inset legs, but once I stained it up and put a few “staging” items on it, I was sold.

I’ve included Amazon affiliate links to the products I used – for full Amazon affiliate disclosure, please see sidebar or bottom of the page.
To match the finish on my bed, I applied 1 coat of Varathane Weathered Wood Accelerator to the entire sofa table then, once dry, I applied a coat of the Varathane Aged Wood Accelerator.
I finished off with a coat of Varathane Triple Thick Polyurethane for durability and protection. (Applied with a paintbrush and then all brush-strokes removed by gently wiping a Foam Paint Brush
over)

It’s really pretty – my only complaint was that the thickness of the wood was only ¾” – and the other furniture in my room is much bulkier.
I put this little cutie up for sale on Kijiji and started again with the thicker 2″ x 12″ wood per the cut list.

MUCH better.
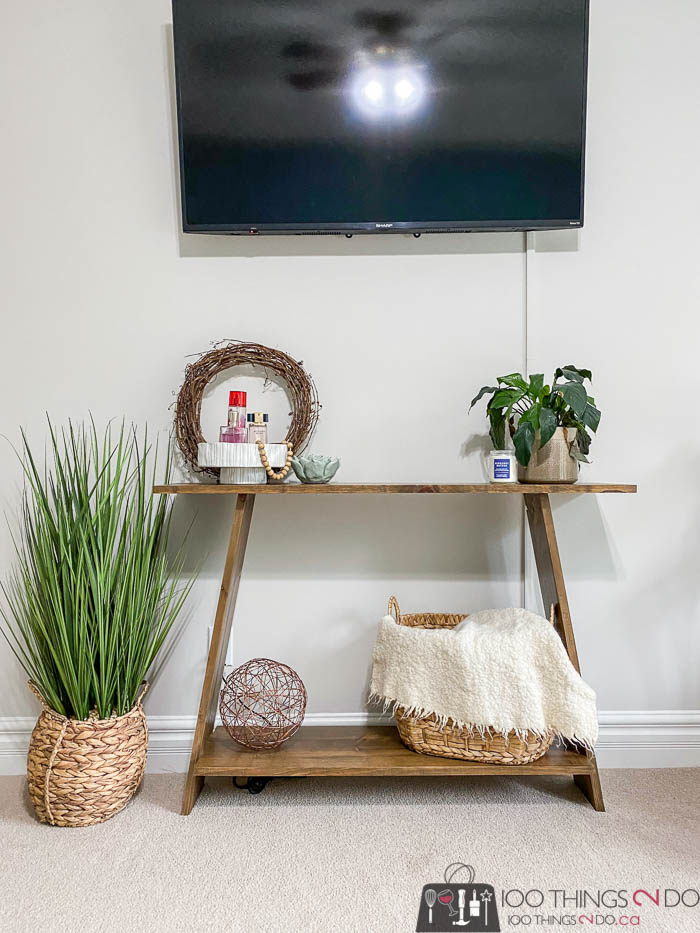
The whole point of the DIY sofa table / DIY console table was to fill the space and hide the TV wires from my master bedroom makeover:

It’s a big wall and that black TV cord was glaringly obvious.
I picked up this nifty Cord Cover Kit on Amazon, stuck it to the wall with the included double-sided tape, and then painted it the same colour as the walls.


Certainly a cleaner look.

With a couple of plants and a few decor pieces to fill in the console table, you barely notice the cords at all!
I have very little luck with live plants – but this Chinese Evergreen beauty was irresistible and considerably cheaper than a faux version. Fingers crossed I can keep him looking this good through the winter – it breathes life into the room. (This Faux Chinese Evergreen is similar, but smaller.)

I did a lot of sanding on these boards, prior to assembly to make life easier, but I didn’t want the edges perfectly smooth. The goal was to remove the rounded edges typical of framing lumber, but still keep a sort of rustic, worn-in look. It’s more obvious on the edges than the surface.


I could have extended this to 60″ wide and still fit the space well – but overall, I’m very pleased.
Inspiration pieces
We’re talking four boards and an investment of approximately $40 CDN for wood, glue and screws. McGee & Co. is selling a very similar version for $1,800 US.

Yes, I’m sure their four-board console table is made with better wood and fancier joinery – but $1,800?! Really?
Restoration Hardware has a three board console table – granted it’s GORGEOUS reclaimed wood and it’s 15″ deep – for $1,600:

The 15″ depth is nice, but you could easily achieve this by laminating two 2″ x 8″ boards together instead of using 2″ x 12″s.


I’ll take my $40 knock-off and be quite pleased thank you very much.
SO! Now that my DIY sofa table article is written, I can officially throw this stupid iMac out the front window. lol
Have a great one!