
Want to add a bit of architectural interest to your garden? This simple lattice privacy screen provides both form and function to your yard.
This post is sponsored by Wagner Spraytech. All commentary and opinions are my own. Thank you for supporting the brands that make it possible to bring you new projects
We have a fairly private backyard. We are separated from the neighbours behind us by a 30 foot easement that the city has paved for a public walkway.
Sure we get dog-walkers and cyclists, but there are some trees and shrubs to keep us a bit private.

We were however, spoiled by the playground that used to be in this corner. You can see from my playground makeover post that it was boarded up along the back to make a “fort” for the kids, but it also gave us a lot more privacy come winter, when the shrubs all lost their leaves.
I’m slowly planning a garden for that back corner of the yard, but first I wanted to bring in something with height and interest as a jumping off point.
I saw this photo on Pinterest and decided I needed a privacy screen.

Problems with my wishlist:
- this is cedar and cedar is ridiculously expensive.
- the lattice section is made up of individual boards (1″ x 2″) that would add even more to the cost
- this is roughly a 4-6′ wide section, where I’d really want about 8-10′ to hide my composter and give privacy when the shrubs aren’t leafy and green.
I needed to come up with a version of this that I could afford, and in a bit larger size.
Simple lattice privacy screen
What I used for 2 sections:
- (2) pieces composite lattice in 4′ x 8′ sheets
- (3) 4″ x 4″ x 8′ pressure treated fence posts
- (3) steel ground spikes for 4×4 posts
- (8) pressure treated fence boards at 8′ long
- 1 ¼” screws
- 2 ½” pocket screws
- 1 ¼” pocket screws
I was shocked to find that composite lattice is actually cheaper than real lattice! Maybe that’s just because lumber is so expensive right now, but I jumped all over the chance to have a privacy screen with 0 maintenance and that is guaranteed to last a lifetime.

Having never made a privacy screen before, it was a bit of a guessing game looking back and forth a million times to my inspiration photo.
I went with 8′ pressure treated fence boards and then ripped them down to half the width.

I added pocket holes about every 8″ on one of the (now ~3″) boards. These will attach the screen section to the 4″ x 4″ posts. The reason I say only one board is so that the pocket holes won’t be visible from the front of the screen. These will be attached to the posts at the back.
Sandwiching the composite lattice between the pocket holed and non-pocket holed boards, I used 1 ¼” screws to hold the three layers together.

I repeated this for the other long side of the lattice, making sure that the pocket hole sides were both on the same face of the screen.
Actually, I didn’t make sure at all. Truthfully, I wasn’t paying attention and put the second board on backwards and had to unscrew the entire thing and attach it correctly before photographing. Just keeping it real folks. If there’s a mistake to be made, I’ll make it. 🤦🏻♀️
Below you can see the back of the screen with all of the pocket holes.

The top and bottom boards needed pocket holes on both ends and on both the front and back boards. This is to hold the lattice in a solid (somewhat solid- lattice is a bit floppy) frame.

Using 2 fence boards as spacers, I attached the lattice frame to the 4″ x 4″ posts – leaving about 1′ of post at the bottom so that they can be dropped into post stakes. The spacers are just so that the lattice frame is roughly centred on the posts.

So where did I go wrong now? Because you know I made more mistakes – per my track record.
Well, the composite lattice is sold in 4′ x 8′ sheets. I used a jigsaw to cut 1′ off of the lattice before building the frame to allow for the 12″ of excess post I left on the bottom.
My fence is 8′ high, so this makes sense right?
In theory – because you can see the actuality. 🤦🏻♀️
My fence is 8′ tall, but the boards go right to the ground, which means my simple lattice privacy screen is a foot too tall to line up with the fence.
Could I take it down, re-frame it and then re-install it again? Of course – but to be honest, it’s in the far back corner of my yard so the difference is not glaringly obvious,
…. and it was hot. 😂
The second lattice privacy screen went a bit differently…
I knew I wanted the arc like in the inspiration photo. In order to have that in a two-panel privacy screen I needed the arc to start flush with the top of the middle post (at 8′) and then curve downwards to a pre-determined height – I chose 5 ½’.
I built the sides and bottom of the lattice frame as per the first one, but then had to come up with a way to design a curve.
Sounds easy?
Nope. Not if you want the curve to fall within the same ~3″ width of the fence boards you’ve ripped down. (To keep the width of the frame pieces consistent)
My Step-Dad came over to help with the “thinking” part of this project – I just couldn’t wrap my head around how to do it – and we ran a string from about 30 different places until a curve fell within one fence board.
From there we created a second line 3″ up from the first to give the same arc at the same width as the rest of the frame.
We cut the curve out with a jigsaw then added pocket holes to either end to attach it to the frame. We used the first board as a template for the second.

From there it was a matter of bringing the jigsaw outside and cutting the lattice along the top edge of the boards.

I attached another 4″ x 4″, cut to 5 ½” tall using two fence boards as spacers and 2 ½” pocket screws.
This section of the privacy screen only has one post attached because it will be sharing a post with the previous section.

For rigidity (without permanence), I opted to use fence post stakes. These can be quite pricey at about $16 CDN per 36″ steel ground spike, but I’ve used them before and they are quite solid and save me from digging an 18″ hole and filling it with concrete.
To install the ground spikes you simply put a piece of scrap 4×4 into the base and then use a sledgehammer to pound it into the ground until only the section that holds the 4″x4″ is visible.

Measure out where your second spike/stake will go and do the same. To check for level, use a scrap piece of wood and run it over both spikes and put a level on top.
I couldn’t believe this, but I was perfectly level at the point that I checked. One more pound with the sledgehammer would have had me going back and forth between the spikes until they were even.

I installed the first lattice privacy screen into the ground stakes and then measured out where the 3rd spike would need to go, keeping in mind that the second screen would be attached to the same middle post.

I dropped the second screen into the ground spike and then used 2 ½” pocket screws to attach the arched screen to the middle fence post. You’ll see here why I only wanted pocket holes on one side of the privacy screen (the back).

I could have stopped here and been pretty pleased with my simple privacy screen, but since I’d spent all that time and money on staining my fence black and updating my privacy planters to black – it only seemed appropriate to have my new fence blend in instead of stand out.
THIS is where I approached my friends at Wagner and asked if they could help a girl out.
Yup, I went to them – and while this is a sponsored post because they provided me with the FLEXiO 4000 to review – it was me that initiated contact because I’ve had such great luck with Wagner products in the past.
THIS is the Wagner FLEXiO 4000

And yes, it comes with 2 paint canisters and 2 different spray heads!!

The yellow Wagner handle you see above, easily twists off and can be twisted on to your second paint canister without exposing your paint to air (so it doesn’t dry out)!
The FLEXiO 4000 comes with a 15′ hose so that you have over 30′ of working space without having to carry around the motor. Not that it is heavy at less than 5lbs, but the extra freedom is nice too.

Wagner FLEXiO 4000
The FLEXiO 4000 stationary paint sprayer is perfect for longer painting projects, with less weight in your hand, because the motor is housed in the base on the ground. It has variable speeds for cutting time and effort on painting projects and can paint a wall 12 times faster than a brush.
The 4000 comes with 2 different nozzles – one for painting multiple rooms, decks and sets of furniture. The other nozzle for fine finishing on cabinets and trim. The new nozzle design delivers an improved spray pattern and adjustable control with less mess and overspray.
It has the flexibility to spray indoors and outdoors with the power to spray unthinned paint and stains with full coverage. Cleaning is faster than a brush or roller with just a few removable parts that separate and rinse clean.
Covers an 8’x10’ surface in minutes:
-Stain: 1 minute
-Latex: 5 minutes
I had to highlight a few key bits there because they are issues that I have with most paint sprayers on the market. First off, not having to thin your paint is FANTASTIC! I rarely got it right in the past and if my mixture was too thick, the sprayer would struggle and spatter paint everywhere. If I diluted the paint too thinly, then it would run down the wood and cover my project with paint drools. I HATED diluting paint!
I don’t need to anymore!
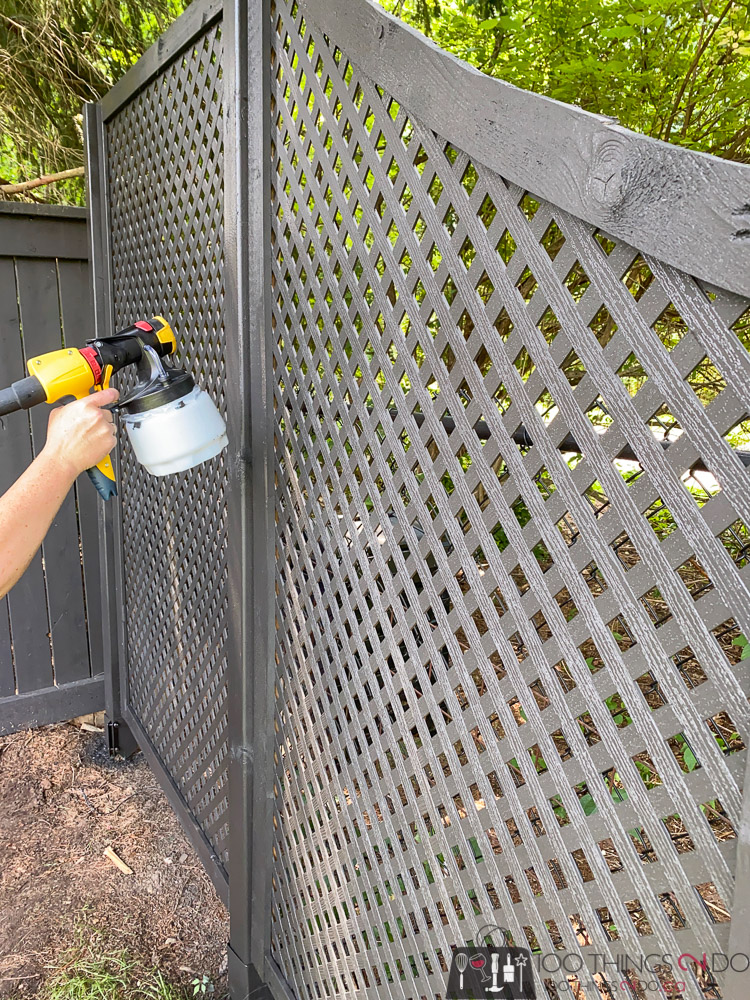
The biggest benefit to using a paint sprayer is it’s ability to get into every nook and cranny…

We’re talking every single square of lattice covered completely – that would have taken ages with a brush. What’s more, I would have undoubtedly ended up with drools on one side of the lattice or the other because of the paintbrush wiping on the hard edges.
Not so my friends!
I timed it, and from priming the Wagner FLEXiO 4000 to finish it took me 6 minutes and 49 seconds to complete my entire privacy screen.
6:49!!

Yes, that’s a VERY happy face!
What’s better still?
I was able to clean the FLEXiO 4000 in 5 minutes with the garden hose.
Less time than it would have taken me to clean a paintbrush or roller for sure.
Take the plastic bag (provided with the FLEXiO) out of the paint canister,

pour the excess paint back into the can, then remove 3 pieces from the handle and spray them with the hose until clean.
SO EASY!

My simple lattice privacy screen looks like a million bucks and it took me less than 20 minutes to paint (and clean) from start to finish.


Garden planning comes next – which will be a feat since the ground is infested with roots from the evergreens, the soil is clay, the area is shaded most of the day, and the pine needles are so acidic that they kill just about everything underneath.
Did mention my dog that loves to dig up any and all gardens so she can rest in the cool dirt? And my cat that thinks any patch of soil is his own personal litter box? 🤦🏻♀️
Yes, I’ll never have “nice things”.
Thank you so much to the team at Wagner – I honestly, truly, and most sincerely LOVE this paint sprayer and can recommend it to anyone as one of the best I’ve tried (and I’ve tried a LOT).
Have a great one!