I made this DIY window box for $0 using scrap 2″x 4″s and you can too!
Good morning friends!
Does it bug you that I use capital letters in my titles? I grew up learning to capitalize letters in a title, but later – while working in Marketing – I learned that the proper way to title articles was to capitalize only the first word in the title.
But that bugs me.
Like Pluto fluctuating between a moon and a planet bugs me.
Like dinosaurs evolving from birds instead of reptiles bugs me.
Tough to shake what you’ve learned as a kid, so if my incorrect use of capitals bugs you – I apologize – but it means that you are younger than I am and can take the irritation more than this old broad can. lol
I’m coming to the end of my “no spend July” and I’ve done relatively well. I’ll show more projects over the next week, but today I’m going to show you the window box I made entirely from scrap wood (=$0)
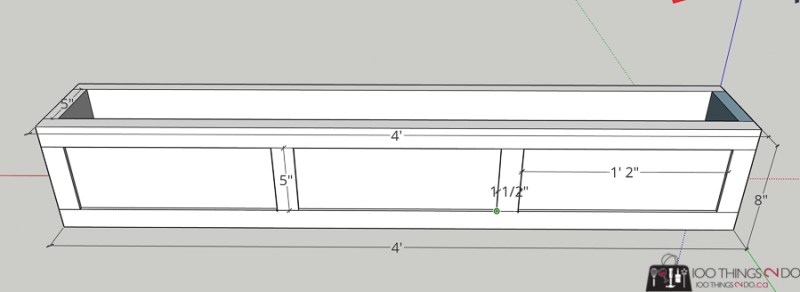
The window sill I wanted to hang this under is on my back patio (my favourite place in the world) and the window width is 48″. You can adjust this to fit your needs.
I will admit that having a planer made this project much less cumbersome. I used leftover 2″ x 4″ wood for the entire project, which makes for a HEAVY window box, but I planed the boards down to about ¾” thick. Still thick – which will help keep the DIY window box from drying out too quickly, but slightly less scrap-wood-looking.
I ripped (on the table saw) down the side boards slightly to remove the rounded edges and then used pocket holes and wood glue to laminate them together. As you can see above, it gave a smooth finish and a tight seam so that soil and water won’t spill out.
I drilled pocket holes in the long sides – along the bottom – and attached them to the base of the window box. I also drilled a few drainage holes in the base, but the seam from the bottom boards (which I didn’t glue) will also allow for a bit of drainage.
I tested out my new WORX Sandeck 5-in-1 sander (5 sanders in one cordless package!) to clean up the sides and upper edge. Don’t want to get slivers when planting this window box every year! *I was provided with the WORX Sandeck 5-in-1 sander to test and review on 100Things2DO.ca
I wanted a shaker-style look for my DIY window box, so I ripped down another 2″ x 4″ board to ¼” strips to use as trim.
I’m not a huge fan of the table saw – I use it often, but it still makes me sweat – but ripping down 2″x4″ boards to create trim just make so much more sense to me than going out and buying ¼” strips at the home improvement store.
I cut the ¼” strips down to length and then glued and brad-nailed them into place on the front and 2 sides of my scrap wood window box.
The 1/4″ strips will hide the bottom seam where you attached the sides to the base, as well as the screw holes from attaching the sides to the front of the window box.
Would you guess this DIY window box was made up from scrap 2″ x 4″ boards?
It’s cute right?
Because this is simple, inexpensive, construction-grade lumber, it won’t weather and patina as well as cedar would have. It likely won’t last as long either, but hey – at $0 I’m not going to complain. It does mean however, that you’ll want to apply some kind of finish to your DIY window box to help give it a not-construction-grade-lumber-look.
My patio furniture is black and I really do like the look of bright flowers against a black background, so I opted for an ebony stain:
In hindsight a black outdoor paint might have looked better, but ebony was what I had on-hand and this is still no-spend-July remember?
My flowers haven’t had enough time to fully fill in my scrap wood window box, but you get the idea.
It just adds a bit of interest and colour to an otherwise bland wall.
Scrap wood, maybe 2 hours of work and inexpensive flowers (nurseries have great deals on flowers this time of the summer) and my favourite room in the house is just that much more wonderful.
Hmmmm, might have to make a bigger outdoor sofa next year.
Go get your build-on!


Hi Shelly, I really enjoy your post’s, how did you attach it to your house?
My step-Dad came up with the idea of using metal strapping – in my case copper – wrapped from the base of the window box and up the back with about 4 holes extra sticking above the top. We then pre-drilled into the mortar on the brick wall with a concrete drill bit and used tap-con screws through the holes in the strapping and into the wall.
Alternative, and if I wasn’t in a no-spend-July, I would have bought L-brackets, attached them to the brick wall with tap-con screws and then placed the window box on top – holding it in place by drilling wood screws up from the bottom of the L-bracket into the window box. Hope that makes sense?
I wanted to know the same thing. It looks great, but how is it attached?
See my response to Craig. xo