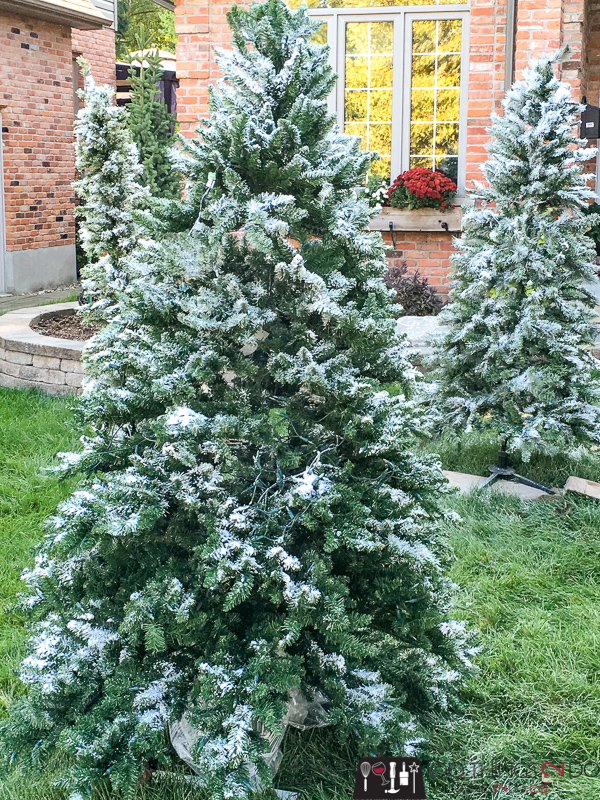
Snow-flocked trees have been all the rage for the past couple of years, but purchasing a pre-flocked tree can be pricey. Instead, add artificial snow to your existing tree in a few easy steps.
Do you have a neighbour that does weird things? Maybe they put out their Hallowe’en decorations in August or their garage is always open and it’s chock-full of chaos.
I’m that neighbour – and it’s to the point now where my neighbours don’t even bat an eye when they see 3 artificial Christmas trees and a 12′ ladder on my front lawn – in October.
BUT, in my defence I have to get my blog articles completed early so that I can share them and hope they spread like wildfire on Pinterest AND who wants to add snow to an artificial Christmas tree when it’s actually cold and snowing out?
I have pined for a flocked Christmas tree, but at around $700 it wasn’t going to happen via Amazon. Instead, I looked up options for adding artificial snow to your own tree and came across rave reviews for SnoFlock. (this is not a sponsored post, I found and purchased SnoFlock on my own).
[fusion_builder_container hundred_percent=”yes” overflow=”visible”][fusion_builder_row][fusion_builder_column type=”1_1″ background_position=”left top” background_color=”” border_size=”” border_color=”” border_style=”solid” spacing=”yes” background_image=”” background_repeat=”no-repeat” padding=”” margin_top=”0px” margin_bottom=”0px” class=”” id=”” animation_type=”” animation_speed=”0.3″ animation_direction=”left” hide_on_mobile=”no” center_content=”no” min_height=”none”]
I had 3 artificial trees that I wanted ‘dusted with snow’ so I picked up the 5lb box of SnoFlock.
I started by fluffing up my Christmas trees like I would at Christmas. I wanted all the branches splayed out so that the artificial snow would hit everywhere. (Who would have thought I’d write a blog post about being a “fluffer” lol)
I started with our oldest Christmas tree – the one that I found hidden behind the furnace because we thought it was broken. I figured if I screwed up, a broken tree was the best place to practice.
Turns out the tree wasn’t broken at all, but it was a bit ugly with the old-fashioned fake pine needles:
I sprayed the entire tree (not plugged in of course) with the mist setting on my garden hose to wash off any accumulated dust and to get ready for the application of the SnoFlock.
I used a sieve and gently shook it over the damp branches.
After you’ve applied your flocking to the dampened branches, you lightly mist it again to turn it into a glue that will solidify.
As you can tell, I didn’t have much luck using the sieve the way the instructions indicated – I think I bought one with holes that were too small for the snow flocking to filter through. There was also the added challenge of a light breeze the day I attempted this, but the SnoFlock really does dry hard, so I would not recommend doing this project indoors.
You can add as little or as much flocking as you want to your artificial tree. I’m Canadian, so I wanted my branches pretty heavily covered – not quite as heavy as an actual snow up here, but heavier than a Georgia sprinkling.
Adding snow to an artificial Christmas tree takes the old, ugly needles and makes them really beautiful – and just imagine it with ornaments added and the lights turned on! (swoon!)
I added flocking to my other two trees as well:
I purchased a 5lb box of SnoFlock which covered these three trees easily, but I might have to grab another 2lb bag to give a heavier coating to the tree in the front. Just my personal preference.
The flocking takes 24 – 48 hours to cure, so I dragged my trees into the garage to dry.
I haven’t tried other brands of artificial snow so I can’t compare, but I will tell you that this was SUPER simple to apply and the results are spectacular!
That looks exactly like snow – right down to the sparkles that shine in the sunlight!
I’m totally buying another box and rolling wet styrofoam balls in the flocking powder – it will make a perfect basket of snowballs!
So, as crazy as I might seem to anyone not adding snow to an artificial Christmas tree in October – it was well worth the time and effort.
30°C (86°F) be damned! I’m ready for Christmas!
Maybe I’ll leave my trees out and say that my house is disguised for Hallowe’en! Yup, I’m THAT neighbour (wink)
Have a great one!
Linked to:
[/fusion_builder_column][/fusion_builder_row][/fusion_builder_container]


Wondered what fun project you were up to! Looks good, neighbor!!!
You are a very patient woman – Christmas trees in October, back-to-school in July and unending sanding and sawing… I am lucky to have neighbours like you (that can handle my crazy!) xo
I truly enjoyed your article! Your trees look so amazing! I never even knew a product like this existed; I mean I’ve seen the type of fake snow in a can, but it never looks real… This looks super real! I really want to try it now. :). Thanks for sharing!
I’ve seen the stuff in the can too and I knew I definitely didn’t want that look. This SnoFlock stuff is amazing – I’ve already ordered another package to flock my wreath and make some snowballs! Have fun!
I love flocked trees and you making flocking “yourself” look easy!
Can flocking be removed easily?
How do you mist with water and add snow on trees with lights?
My trees are pre-lit – so as long as your tree isn’t plugged in, you can can use a mister and the Snoflock no problem. My trees actually had a layer of dust on them from being stored in the basement (uncovered), so I actually hosed them down before starting. I’m not sure this is recommended or necessary, but my trees (and lights) all worked perfectly after drying. *Note- try at your own risk.