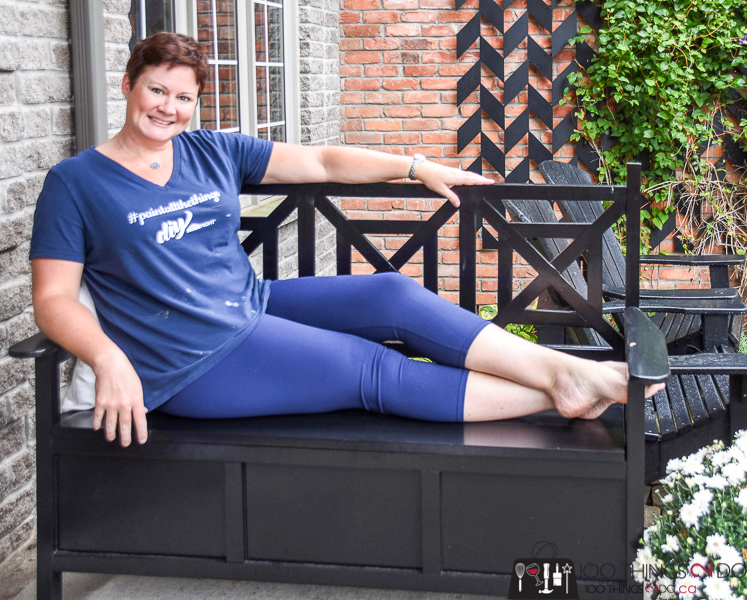
Using free building plans from Jen Woodhouse, I was able to DIY an outdoor storage bench perfect for hiding Amazon deliveries.
Have you seen Jen Woodhouse’s outdoor storage bench? It’s gorgeous (of course) and a necessity (I feel) for anyone and everyone that receives packages in the mail.
And who doesn’t?
Every company on the planet seems to be offering online shopping and delivery options to keep us introverts out of the mall and in our happy-pajamas. There are however, a rare few “yucky” people who take advantage of this and swipe packages right off of your doorstep. No, we haven’t been hit – but with Christmas coming, and Santa deliveries in the not-so-distant future, I didn’t want to risk leaving tempting packages out.
Enter Jen’s outdoor storage bench and my attempt to whip one out for myself.
I won’t detail her building plans (which are available for free), but I will help you out by showing you where I screwed up – so you don’t have to.
Outdoor bench screw-ups:
- Don’t make two of the same arms. Jen’s plans clearly state to make two “mirror-image arms”. I made two the same – which meant un-gluing, pulling nails and fixing right from the get-go.

- If you plane your lumber down – to remove the rounded edges – make sure to adjust your pocket hole and pocket hole screw depth. Your 1×2’s won’t be ¾” thick and drilling pocket holes at that setting will cause the screws to break through the wood in awkward and ugly ways.
- Don’t build your fretwork before attaching the back strapping. I thought I’d streamline the process and build all three fretwork pieces before checking for fit:

Two ended up on the outdoor bench: 
and needed some big minor adjustments, and the third…
4. When Jen’s outdoor bench plans indicate to use a 1″ board as a spacer (so roughly a ¾” gap between boards, DON’T use a 1″ board that you have planed down to ½” or you will have to use a 1×4″ for your last slat. (AKA: the gaps are too small) It looks okay, and it’s inside – but not very professional.
- Jen’s plans don’t tell you to reinforce the seat/lid with perpendicular strips – but since I’ve met Jen, and I know my butt is considerably larger than hers – I felt safer knowing that the seat could actually bear my weight. What you should avoid doing here is lining up the reinforcing strips right to the front edge of the seat. The lid won’t close.

- I made a couple of other changes to Jen’s plans as well – not errors, just changes to better fit my needs – like trimming out the back of my outdoor bench, because on my porch the back will be exposed. I also reinforced the upper and lower 1 x 2 boards (holding the fretwork) for a little extra rigidity (remember, I planed my boards down to ~½”, so they were weaker than had I left them well enough alone.
- When installing your armrests, make sure your 1×4″ board is flush with the inside of the arm frame. FLUSH, or you won’t be able to open the bench lid.
Now I don’t want you to get me wrong here – Jen’s plans are perfect and detailed in every single step – IF you follow them. I’m the chick that looks at a picture and tries to copy it without reading the instructions, so all errors were entirely my fault. I’m sharing my fails just in case you are a non-manual-reading-person as well.
Now on to the stuff I didn’t screw up; I decided that my DIY outdoor bench was going to be painted, so I started finishing with two good coats of Zinsser® Bulls Eye 1-2-3® Water-Base Primer. Exterior grade to protect the wood through a Canadian winter. Inside, outside, bottom, top – every single inch.
*Sponsored: I was provided materials from Rust-Oleum® Canada and tools from HomeRight® for other projects and had enough to finish this bench as well.
I brought out my HomeRight® Super Finish Max paint sprayer (#paintallthethings) and applied 2 coats of Painter’s Touch® Multi-Purpose Brush-On Paint in semi-gloss black.
My front door is black and I have a beautiful trellis that is black so I wanted consistency plus, I find that flowers and cushions really POP against a black background.
AmIRight or AmIRight?
You can see how my porch is open on one side so that’s why I wanted the back of my outdoor bench to be trimmed out as well.
I really should have covered those pocket holes, but the plugs wouldn’t fit – I guess I should chalk that up to error #8 eh?
Look at all that storage! You can hide a TON of Amazon packages in this bad boy!
Jen designed her outdoor storage bench plans to fit a standard-sized cushion on top, but because I expect mine will get opened and closed a fair amount, I won’t be adding one.
I already call it my “Amazon bench” lol.
I took a shot with the DIY outdoor bench against the wall to see if it would photograph better.
I’m so pleased with how this turned out (despite the extra steps I unnecessarily took in getting there) – thank you so much Jen for the awesome building plans!
Thank you HomeRight TPS – #paintallthethings
Have a great one (and get building before Christmas shopping rolls around!)
Linked to:


One Response