
I have received so many compliments on my DIY Catio (enclosed cat patio)! Today I’m sharing the 12 steps I used to determine the size, shape and build for mine so that you can make one too. Trust me, it’s more than just birds and mice that will be happy your cat isn’t traipsing the neighbourhood.
Another day, another story…
About a month ago our indoor cat “Cricket” managed to escape the house and was lost for four days. Needless to say I was beside myself with worry because we have lost 2 cats in the past; one to daylily or wisteria poisoning and another got out and never came back again. After 4 days my neighbour let me know he’d seen her underneath his deck, so I was finally able to lure her out and bring her back home.
I immediately planned our “catio” – enclosed patio for cats – to attach to one of my back windows.
My timeline was ramped up considerably when I became a Grandma…

These are my seven, 1-week old bunny babies. They are so adorable they are EDIBLE! And most cats would agree. 🤦🏻♀️
I seem to get one litter in my back lawn every Spring, and every Spring I lose them. Cats (mine and the neighbour’s), excited dogs (Dunnigan bounced around in happiness and trampled a litter), and I’m sure predators have snuck a snack or two.
Not this year folks!
I put some wire fencing around the nest with a small opening for Mama to get in, and then put a few boards over top of the fencing to keep rain and Bentley out (did you know baby bunnies can drown in their nest if the rain doesn’t drain into the soil quickly?).
Then I started on my Catio:
I can share measurements and cut list to anyone with similar windows to mine, but there are so many different sizes and ways to open windows that I thought I’d share the concept and let you adjust to your window opening.
First up – the window I chose for my Catio:

It’s a large casement (opening outwards) window with a transom on top. It’s in my family room, so easy to access with no furniture in front of it, and above a garden at the back of the house.
This posed a few problems;
- I needed my catio to be deep enough/protrude out enough so that the window could be opened fully without hitting the cat enclosure frame.
- So the cats couldn’t climb and escape out of the top, I needed to include the transom window in my building plans. This ensured that all four sides of the frame were attached to the brick exterior wall.
- It’s a BIG opening – I want my cats and bunnies safe, but a giant eyesore wasn’t the trade-off I wanted.
Step 1
Measure where you plan to attach the catio frame to the outside of your home. Use painter’s tape if it helps to visualize.
Step 2
Build the side frames (rectangles) of your cat enclosure. I used 2×3 wood because I felt 2×4 was too heavy-looking, but wasn’t confident 2×2 would be strong enough. I used pocket holes and 1 ¼” pocket screws to attach the sides to the top and bottom.

Step 3
Before adding a centre brace, check the size of the 16-gauge galvanized welded fence. I did a fair amount of research on this, and the overall consensus was that welded wire of at least 16-gauge would be the strongest for containing cat-sized animals. The openings in this fencing is 2″ by 4″ – so not terribly view-obstructing, but not so big that a cat can squeeze through.
I bought a roll – 50′ – of 48″ fencing. WAAAAAY overkill – I have a ton leftover if you live in London and want some.
I lined up the fencing with the top of the catio and marked where I’d need a cross-brace to staple into. Attach the cross brace with 1 ¼” pocket screws (face the pocket holes to the underside so rain won’t pool in them)

Step 4
Using wire cutters, clip your fencing so that the edges have no sharp ends sticking out. Note: I tried a few things for attaching the fencing to the catio frame, but found that the wire cut-offs, bent in half and hammered in were the best, strongest, and most aesthetically pleasing option.
Step 5 (which probably should have been Step 4)
If you are going to use an outdoor paint or stain on your catio, it is much easier to do it before attaching the fencing. Black is a colour that recedes from sight. It’s a neutral, that is fairly dramatic, but it also makes rooms etc look smaller. It has the added advantage of being less noticeable / not as glaringly obvious as other wood tones or colours. My black fence is one of my favourite design decisions in my backyard, so it just made sense to use some leftover Benjamin Moore Arborcoat in Black Beauty to paint my cat enclosure. I did both sides and the pieces that will later be attached as the front.

Step 6
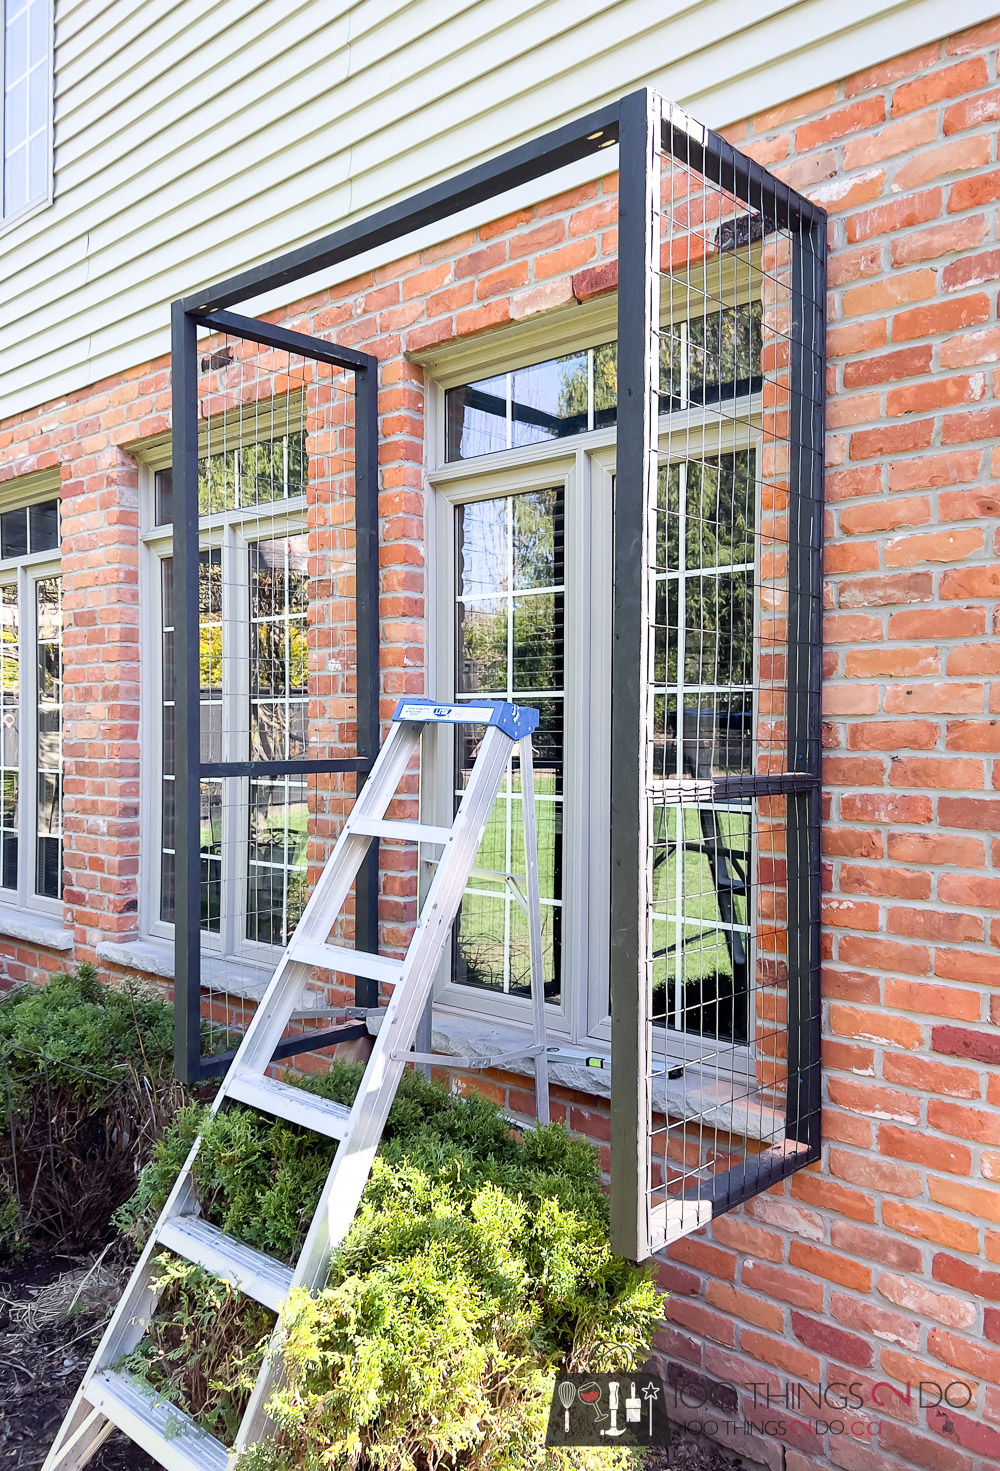
You will need a power drill and special masonry bits (Amazon affiliate link) for this next part: line up your catio frame to the pre-planned outside of your home. Use a level to make sure the frame is plumb. A fairly easy way to do this is to start at the highest point of your catio, pre-drill with your masonry bit, then attach with 3″ tapcon screws (made for brickwork) loosely. The frame will hang down from that top point plumb.

Holding the side frames to the wall, pre-drilling into your brickwork, then attaching the frame to the wall with tapcon screws would be easier as a two-man job. In my case; a 1-woman job. 😂 (You’ll see in the photo below how I used some scrap wood to help hold the frame in place.)

I used tapcon screws about every 12″.
Something to note here: I made sure the bottom of my side frames were lined up BELOW the top of the window sill. This is so that the window can open freely even after I add a 5/8″ flooring to the cat enclosure.

Step 7
I didn’t cut the pieces for the front of my catio until this point. I did stain the wood, but didn’t cut it down to size or add pocket holes until I was able to accurately measure the distance in the centre opening. Once the sides were firmly attached to the wall, I was able to cut 3 lengths of 2×3 to fit in-between.
Step 8
Cut and attach pressure treated wood to the top of your cat enclosure. I left spaces between for both sunlight and to make sure that snow won’t accumulate on top on the winter. Some people use proper shingles or corrugated roof panels. This seemed unnecessary to me because my catio is so wide open (tall and wide) that if it rains, the water is going to blow inside regardless of what roof I put on. I chose to save a few bucks and go with pressure treated fence boards.

Step 9
Cut and attach your 16-gauge fencing to the upper front section of your catio. Attach it with staples, or the bent wire bits as suggested above, to the top and sides of your cat enclosure – but do NOT attach it to the cross-brace yet.

Step 10
Attach the flooring to your cat enclosure. I went with inexpensive 5/8″ pressure treated fence boards – which totally work, but they do have some give to them. I may have to replace them in time to something a bit thicker and with less give. These I attached with deck screws to the bottom of the side frames.

Step 11
Add in the middle and bottom frame pieces (if you haven’t already)

Step 12
In researching catios, it seems that most have some kind of door on the front or side. I didn’t want that; just another visual impediment and an extra step that seemed unnecessary for this particular window.
BUT, should I need to get to the window for cleaning, or to replace the flooring or something, I did need a way inside. With this in mind, I copied what Habitat Haven does for their Catio Kits (prices range from $380 US to almost $5,000 US) and used zip ties to attach the lower section of fencing to the front of the cat enclosure.

If I need to get in, these are easily cut and replaced. You can see a line of them (before I cut the ends) at the mid-point of the catio.

The sides and bottom of the fencing are still attached with staples or wires. Maybe I should have used zip ties on the sides too? Then the whole bottom fence section would have been able to fold outwards? Hmmmm, not sure about the durability of that though? Something to ponder if you’re attempting your own catio this weekend.
That’s it guys! 12 Steps to building your own catio!!
The cats couldn’t wait to give it a try.

I’ve since added some cat grass for them to nibble, a few toys and a cat bed. They are out there from dawn till dusk (when I have to pull them inside).

Okay, so attaching a catio to your house is not the prettiest thing you can do aesthetically, but with it painted black I think it’s not as glaringly obvious either.
In fact, I get so many compliments and requests for “where did you get your catio” I’d actually consider building them on a regular basis. It’s a neighbourhood hit!

Just look at Bentley peeking out the window in behind! lol

This is a view from the inside of the house. So you can see I didn’t lose a ton of light, or obstruct the view very much at all.

Before you ask, yes, bugs can get in if the window is open for the cats to come and go. I haven’t figured out a solution to this just yet, but it hasn’t been a big problem either. I don’t turn on the indoor lights until the window is closed, so I’m not attracting too many bugs to begin with.

I really should have done this sooner – but hindsight is always 20-20 eh?
Well, as of now, no more lost cats, no more cat poop in the gardens and best of all:

My grand-babies (at least 6) survived to three weeks and moved out without injury or trauma.
Little buggers didn’t even say goodbye.
The executioners are not impressed.

TOTAL COST FOR DIY CATIO: $240 CDN (including masonry bits). ~$180 US, €167
Please pin, like, build and share and we can make a HUGE difference in the bird and rodent populations – which of course feed other animals.
Have a great one!
One Response