
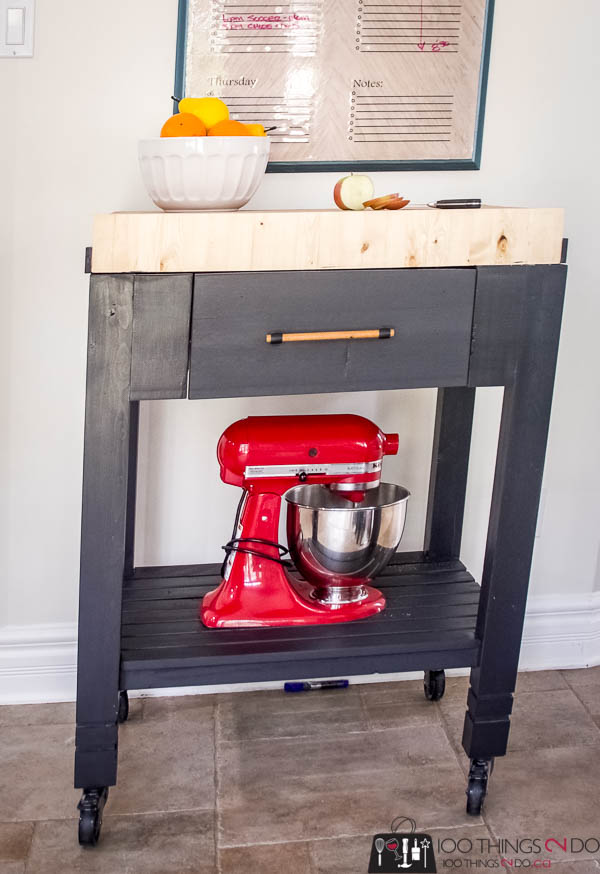
Build your own portable kitchen island with these easy building plans (except the drawer, the drawer sucked, but the rest was easy lol). Portable prep station
I saw on of these portable kitchen islands / portable prep station at HomeSense awhile back and I was determined to see if I could make one myself.
Turns out you can, and a much better version as well, with a 3 ½” endgrain butcher block top no less!
Cut list:
- (8) pieces 2×4 cut to 32″ long (we’ll cut these down again after we laminate them together)
- (2) pieces 1×8 cut to 18″ long
- (1) piece 1×8 cut to 22″ long
- (2) pieces 1×8 cut to 6″ long (may vary depending on the size of drawer you want)
- (2) pieces 2×2 cut to 22″ long
- (2) pieces 2×2 cut to 18″ long
- (8) pieces 1×3 cut to 5″ long
- Drawer box: (2) pieces 1×6 cut to 14″ long
- (2) pieces 1×6 cut to 8″ long
- ¼” ply wood for base
- scrap 1×8 to create interior drawer walls


Note: this post contains affiliate links to the products I use in my garage. For more information, please see affiliate disclosure in sidebar.
Tools:
- mitre saw
- table saw
- planer
- drill
- pocket hole jig
- food-safe wood glue
- 40″ clamps
- random orbit sander
- pocket hole screws
- finishing nails or nailer
- hammer
Portable kitchen island
Start by laminating your 30″ 2×4’s together. This means plane one side smooth (no rounded corners) and then use wood glue and clamps to hold 2 boards until dry. Repeat for the remaining three pairs of 2×4’s – these will be your legs.
Run your portable prep station legs through the planer until all the sides are smooth and there are no rounded corners. You will be left with legs that are approximately 3″ square.

Drill pocket holes as shown above.
Attach the 18″ side piece between two legs and glue and screw into place with pocket screws. I lined the outside edge of the board with the outside edge of the leg, but in hindsight, a ¼” gap might have had a better aesthetic look.
Repeat for the opposite side, but make sure that your pocket screws are facing inwards and opposite to the first side. (I screwed up here). You want all of your pocket joinery to be inside the portable kitchen island.

Attach the 2×2 braces so that they line up with the inside of the leg. These will be topped with a slat shelf later on, but for now we want them lined up with the inside edge of the legs.
Attach the back 1 x8 and the corresponding 2×2 ‘s – front and back to create this carcass:

Cut your 1×3 boards to length and space them approximately 1″ apart on the lower shelf. Glue and nail in place with 1 ¼” finishing nails/nail gun,
The front and back boards will need to be trimmed to fit around the legs of your portable prep station. I placed them underneath the leg, traced the outline and cut them with a jig saw.

Attach your Headbourne 8276E Designer Casters 3 inch Polyurethane Black Mag Designer Caster, 4 Pack and your body is almost finished!
Cut your 2 x 4 boards to 3 ½” pieces. Glue enough together to make 30″ of end grain and then clamp tightly until dry.

Once you have a few rows of the end grain, glue them together and clamp tightly overnight. If you are working with a 12″ planer, then don’t glue more than three rows together at a time or it won’t fit through your machine.

Don’t worry about the short pieces in the photo, those will be on the underside and won’t be seen in the end.
Once you have three 3-piece rows and 1 extra row, run them through the planer very carefully. Planers don’t like end grain and this can be dangerous if not done with supreme caution. Do not stand directly behind the planer when feeding through as shards can come off and shoot back at you and only lower the gauge by a minimal amount each round. Do not try to even the boards out in one-feel swoop. Run each section through the planer before lowering the blade and repeating so that all of your boards will be exactly the same height.

Glue your 3 + 1 sections together and clamp tightly overnight.
Sand your butcher block smooth with 120 and 220 grit sand paper with either a belt sander or a random orbit sander (which I used). You’ll be left with a gorgeous piece like the above.
Check your measurements on your rolling kitchen island and cut your butcher block on your table saw so that all the sides are even and an exact fit to the base.

What you don’t see in the above photo, but I added later on, was a piece of ½” plywood underneath the butcher block top. I found that the weight of the top by itself caused the legs to spread slightly – by about 1/8″ – which made fitting a drawer very difficult. The extra plywood layer should be screwed down into the legs to help keep the entire prep station square and solid.

Once you have your portable kitchen island complete to this stage, it’s time to retrofit the drawer. Your drawer box should be 1″ smaller than the opening you left for it at the front of your prep station. I attached the 6″ side pieces to the legs using pocket hole screws and then used some scrap wood to connect those to the back of the island. This part is totally optional – you don’t have to add a drawer if you want to save yourself from living hell, if you aren’t fluent in drawer installation. I hate drawers, but I built one to say I tried.

I used 16″ soft-close, full-extension drawer glides from Liberty Hardware. You could use less expensive drawer glides, but for kitchen cabinetry, and a drawer that might end up holding a collection of knives, I like the soft-close and full-extension so things won’t rattle around as much and I can reach everything right to the back of the drawer.
I also got this awesome rustic-industrial handle for the drawer front.

Once your drawer box is built – and perfectly square – and you’ve installed it with the Liberty Hardware glides, you can add the face frame to the front and the handle.
Rogue Engineer has a great YouTube video on building and installing drawer boxes, so I’ll defer to the professional:

My drawer front isn’t flush with the front of the portable kitchen island – that’s a mistake, not at all intentional – but after swearing at the drawer installation for days and days, and begging my friend to come and help me, I was too pissed off to uninstall it to make sure the front was flush.
A little paint makes it look okay.

I love that handle! I just wish Liberty Hardware had a coordinating towel bar that I could add to the side!

I coated the endgrain butcher block top with food-safe butcher block oil and then a coating of butcher block wax to keep the wood protected.

You could chop meat on this for YEARS the top is so thick. Once it gets a little ratty looking, bring out the sander, take a layer off and you have a brand new portable prep station surface all over again!

The slat shelf underneath can hold baking supplies and appliances, or if you use this on a patio, you could tuck a cooler on the shelf for a rolling party!

I love the extra detailing in the legs – well worth the few minutes of time it took to cut them in.

Did I mention that I’m crazy for this end grain look? I tried to stagger the pieces of 2×4 so that each row had grains going in different directions and from different boards to get a fluctuation in colour and grain. It’s so pretty – and did I mention it’s made from Home Improvement store stud lumber 2×4’s? Unbelievable!


(I wish I had one photo that was straight ugh!)

If you work through these plans and you find that I’ve missed a step or something doesn’t quite make sense, please let me know. I usually write my blog posts after I’ve finished the build so I’m going from memory as to what steps came when.
Have fun building and Happy Easter!
love it, love it, love it.