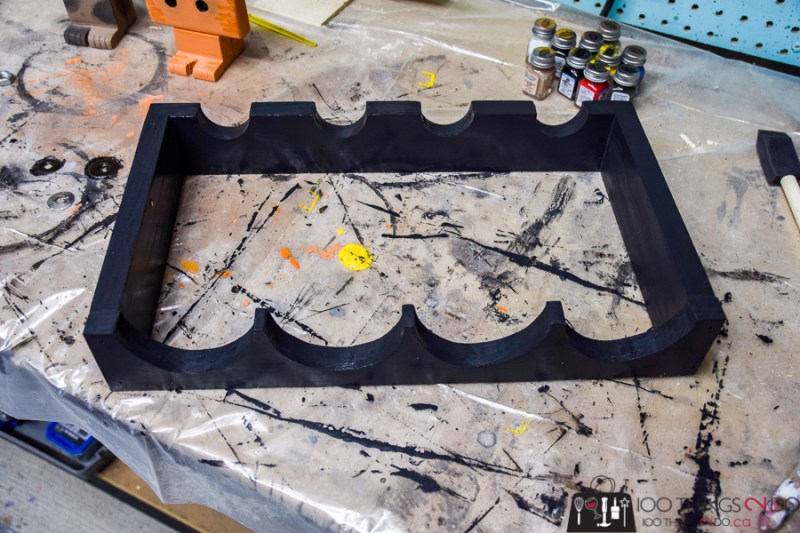
Four pieces of scrap wood are all you need to build this small wine rack – perfect for holding up to 7 bottles of your favourite red (or white).
I’m starting out the New Year with a wish list of projects that is almost overwhelming. The problem isn’t any one project in particular, it’s the “but firsts” that precede each.
I’ve finally weakened Hubby’s resolve and am finally going to do that kitchen makeover I’ve hinted at for 2 years…
but first I need a workspace to put all the cupboards and drawers – so I’m planning out my new and improved awesome-sauce workbench…
but first I need to refinish my Grandmother’s typewriter desk that has sat in my garage for months and months to make space for said workbench.
But workbenches and kitchen makeovers are big, BIG projects and I need some smaller projects to keep the blog running. I have several signs I purchased from Details 2 Enjoy that I need to make and frame…
but first I need to frame up my paint by numbers piece that I just recently finished (more on that another day)
but first I need to create some surface space in my office to work,
which means I need to get my Christmas items organized and into some kind of storage…
You can see how it’s never-ending.
I decided to tackle one teeny-tiny project today – just to get a little sawdust in my hair after the Holiday hiatus – so I whipped out a small scrap wood wine rack to hold those Holiday bottles we received.
There is nothing fancy about this, no detailed building plans – just four pieces of ¾” by 3 ¾” scrap wood.
Scrap wood wine rack
- (2) pieces ¾” wood cut to 3 ¾” by 16″
- (2) pieces ¾” wood cut to 3 ¾” by 8″
- wood glue
- brad nailer/finishing nails
- clamps
- paint or stain
I actually made this wine rack twice – the second version has better spacing – so mark your board at 2 ½”, 6 ¼” 9 ¾” and 13 ½”. These will be the centre points of your half circles. I traced out the bottom of my largest bottle of wine onto one of the 16″ boards – making sure to leave a ¾” space for the sides to be attached (see above).
I got out my handy-dandy scroll saw and cut the half circles out.
I marked my second 16″ board at the same points as above, but then cut a smaller half circle for the wine bottle neck. These were approximately 2 ½” in diameter – but you could go bigger if you wanted.
Once all the semi-circles were cut, it was just a matter of gluing the 8″ boards in between the 16″ ones. I used a bit of wood glue and clamps to get a nice, tight fit and then added finishing nails afterwards for extra strength.
You’ll notice that the spacing between the large bottle ends is pretty narrow – that was intentional on my part (but not necessarily aesthetically pleasing). This scrap wood wine rack will hold 4 bottles in the grooves, but I wanted to be able to layer a few more on top – so I wanted the lower bottles to be pretty close together.
(This is my first attempt above, and you can see my spacing is way off – that’s why there’s a version 2) Below is a bit better with equal spacing between each bottle.
This is an organizational solution, not a suggestion for any type of wine connoisseur – I’m sure there are rules about what angle to tilt the bottles to keep silt in the neck etc. I just needed something flat so I could layer bottles on top of bottles.
I gave my scrap wood wine rack a thorough sanding and then added a coat of paint to match the buffet that I’m planning on using it in.
We don’t drink a lot of wine, so this small wine rack is plenty big enough to hold our stash (7 bottles).
You can leave it out as a decor piece if you want, but I built it with the intention of tucking it into the small shelf we have in our dining room buffet.
Small, unobtrusive and perfect for keeping bottles from rolling around in the shelf space – which is what they’ve done up until now.
Four pieces of scrap wood and maybe 20 minutes of your time to make this simple wine rack.
One of my “but firsts” done (but first I need to put away Christmas and get my house back in order); wine Christmas gifts, organized and put away – CHECK!
How do you eat an elephant? One bite at a time.
Bring it on 2019!
Have a great one.
Linked to:


I do a lot of recycling especially wood from pallets and am about to start building wishing well from it. How or can I do a tutorial on my work and show more people it can be done many thanks
It’s a bit of an involved process to set up a blog – steep learning curve – but well worth it if it’s something you enjoy. Why not start out posting your photos and progress on Facebook or Instagram and see if it’s something you enjoy, then move on to a blog from there?