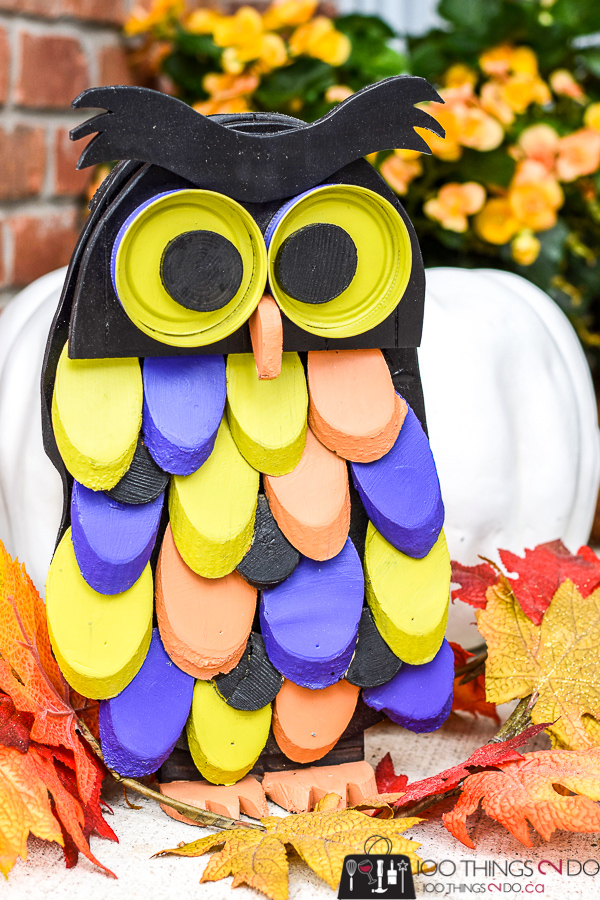
When you’ve finished your Fall pruning, hang on to a branch or two and make this adorable Hallowe’en Owl.
My friend sent me a photo of an adorable owl made from branch slices that she’d seen in a shop somewhere. I had a bit of Fall pruning that needed doing – so it seemed serendipitous that I should attempt to make my own branch slice owl in awesome Hallowe’en colours.
*Note: Cutting the branch into thin slices, on an angle, is not easy. The branch is unstable and if you don’t have a very firm grip you will get kickback. Please wear protective gear if you attempt this. ~from the chick that just about pee’d herself making this.
I set my mitre saw to a 45° bevel and created a jig to butt the branch up to so that each slice was of uniform thickness. (not shown)
Carefully, and with a firm grip, I cut slices from the branches until I had a bout 20 – these will make up the DIY Hallowe’en owl feathers, spacers, feet and beak.
Behr paints had a great display at my local home improvement store, so I grabbed tester pots based on a Hallowe’en palette they’d put together: Purple Prince P550-7, Margarita P330-6 and Orange Liqueur M210-6.
I painted the branch slices in an assortment of these colours (with a couple of black thrown in) and set aside.
While the paint was drying on my Hallowe’en owl feathers, I put together a few pieces of scrap wood to create the owl body. I glued and clamped these thin strips until they were dry, but you could use a solid scrap piece if you have one.
I traced a half circle, from a gallon paint can, on either end of my pieced board.
I created a sort of oval with one section and then cut a second half circle to act as my Hallowe’en Owl head. I cut these out with my jigsaw.
I painted the front and back of both pieces – the owl body and owl face – in black paint. Once they were dry, I set out my coloured branch slices in a random order and attached them to the backing starting with the bottom row and working my way up.
My owl’s eyes are made from mason jar lids, so I made sure to leave enough room at the top of my owl body so that they would fit.
Using a branch slice as a spacer between the owl body (back) and owl face, I attached the head with wood glue, overlapping the top ‘feathers’ slightly and let dry.
I painted my mason jar lid eyes with the purple on the outside and green on the inside and then cut two circles from scrap wood to act as pupils.
My Hallowe’en owl eyebrows were just a freehand sketch I made on another piece of scrap ¼” wood – again painted and adhered with wood glue.
Even the cute little toes and beak were cut from branch slices!
If you want your DIY wood owl to be a bit more spooky or creepy for Hallowe’en, lower the eyebrow over top of the mason jar lids to create a mean frown, or narrow the wood pupils into slits.
I like cute.
It’s early for DIY Hallowe’en decor, but it’s perfect timing for yard pruning, so I wanted to get this post up early so you could save some branches.
Create a grouping of three in varying heights, or tuck one on your mantle (when the season arrives lol).
I love how my DIY Hallowe’en decor turned out, but it wasn’t without trial and error; the saw kicked back branch slices a few times (enough to scare me) and I actually bent a mitre saw blade in the process. I didn’t let my wood glue dry completely before attempting to attach my second and third row of branch slice feathers, so they ended up popping off and I had to reinforce them with brad nails… the front of my wood owl is adorable, the back is a shit-show of too-long brad nails.
That’s okay – the back will stay to the wall. (wink)
Just a few tips for you so that you don’t end up with the same “Oopsies” as I did.
But without “Oopsies”, we never learn anything right?
I must be bordering on genius. lol
For more ridiculously early super-fun DIY Hallowe’en decor ideas, click on any of the images below:
Have a great one!


Looks even better than the one I saw in the shop! Great work Shelly!
Awe shucks. Thanks for the inspiration! Keep ’em coming!