It’s TIME!!
Time to get building for the Holidays and I’m starting my Holiday builds with this DIY Christmas sled.
Easy, inexpensive and a great beginner building project!
I know, there are tons of plans online for wooden sleds (decorative). Heck, I used Fynes Designs sled plans to build this little cutie:
Which I love, but is not really mass-produceable. There are several small cuts and notches that require a pretty steady hand with a jigsaw – not difficult, but it could be easier as well.
I wanted to create my own version of a DIY Christmas sled that required a little less finagling. Something sturdy that you could put gifts, or kids, on – that didn’t require a whole lot of its-bitsy measurements.
So I went out to the She-Shop and removed what I could from the original sled and added in easier steps to create this little cutie:
I was going to title this the “paint can sled”, or “Tupperware sled” because that’s what I used to create all of the rounded sections. lol
I’ll show you measurements and plans, but know that I was really slapping this together with very few measurements.
DIY Christmas Sled
Cut list:
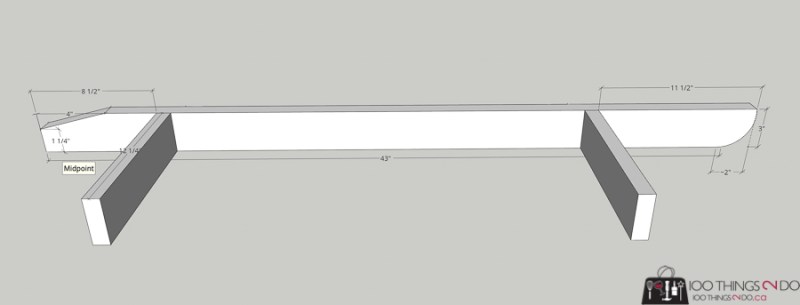
- (2) 2 ½” x 43″ (by 1″ thick – all my boards are 1″ thick)
- (2) 2 ½” x 12 ½”
- (1) 2 ½” x 18″
- (5) 2 ½” x 29″
Start with the sled skis; mark one end at 1 ¼” up from the bottom (short side) and 4″ in from the end. Draw a line and cut. This is the back of your sled runner.
The front of my plan indicates 3″ sled runners (but really they are 2 ½”). Mark 2″ in from the front of the sled ski and then line up a quart-sized can of paint from the end of the board to the 2″ mark. Trace the paint can to create the front arch of the sled runner.
Repeat (or trace) onto the second 43″ board.
Using 2″ deck screws, attach your two cross-braces at 8 ½” from the tail of your wooden sled and 11 ½” from the nose. I drilled in from the outside of the sled into the boards.
Because I wanted to have the option to use my DIY sled for photos and/or to load gifts on top of, I decided to add a centre cross-brace for extra strength. This isn’t necessary as the sled is pretty strong as-is, I just added it as a “just-in-case”.
You’ll notice I sanded and painted the runners and base before attaching the seat panels.
DO THIS. Trust me, trying to paint after it is completely assembled is a PITA.
The top section of your wood sled might look a bit complicated but again, it’s just a matter of tracing a quart-sized can of paint onto your 18″ board 1″ in from the outer edge and ending 4″ in. Repeat the paint-can technique to trace out the upper, rounded corners of your ‘steering column” (which won’t actually steer).
 Paint to match your runners and drill a hole in either end for threading the rope through.
I attached mine after the seat panels were in place, but it ended up being 3 ½” from the nose of the sled runners.
For the DIY Christmas sled seat, I cut 5 boards at 29″ long.
I lined them up on my workbench at staggered heights (side-by-side with no spaces) and then traced a large Tupperware bowl onto the boards at the top and bottom. For the bottom section, I lined up the bowl so that it was inset from either side board by 1″ – just so my sled seat didn’t come to a sharp point and hid more of the runner.
I cut the boards with a jigsaw on the marked lines and then sanded smooth with 120 grit sandpaper.
I stained this (with an outdoor stain) before attaching to the sled base with 2″ deck screws.
I love how the red peeks through the seat spaces – which were made by tucking 3 paint sticks between each board.
I told you I had very few “formal” measurements. This was all about repeatable cutting and spacing without having to bring out the tape measure and squint to see every 16th of an inch.
Got a big Tupperware bowl? A quart-sized can of paint and a few paint-sticks – you’re laughing!
I’m really pleased with how this turned out, and even more pleased that I was able to skinny down the steps to more manageable mouthfuls for anyone not completely comfortable with a jigsaw.
Always remember – sanding hides/removes a LOT of mistakes. lol
Ignore the extra holes in the runners – I was using scrap, pressure-treated wood from an old fence to build my prototype.
I added some jute twine twisted into a bundle for the steering column and simply knotted it at the back.
I did rough-up the paint job a bit to give it more of a rustic feel and then added a swag I found at Michael’s.
I think I should paint the screws in the steering section? I just noticed them now.
What’s better come winter than sledding and snowballs?
(To make these snow-flocked snowballs, click the highlighted link)
Still some decorating to go, but a very easy DIY to start.
I’m tempted to downsize this wood sled and make another to sit in front of my Christmas tree – all laden with gifts…. I promise to share if I do.
To build Fynes Designs Vintage sled click the highlighted link.
Have a great Sunday everyone!


