Upgrading my plugs to USB receptacles has been on my wish list for MONTHS – but I was too nervous to attempt any electrical work (you know my habit of “learning things the hard way”). Well, the girls got wireless headphones for Christmas, and Chloë recently bought her own iPod (yup, she saved up her birthday money and allowance to get one), so my house is overflowing with USB cords in every plug you can imagine.
Which means nothing else can get plugged in.
It was time to tackle this small, but life-changing, home improvement and upgrade to USB receptacles.
Let me start by telling you what I learned the hard way…
Just because the overhead light in a room goes off, it does not necessarily mean the plug you are going to replace has been shut off. PLEASE plug a lamp into that specific outlet to be certain that you are shutting off the power (via the fuse box) to that exact site.
A screw driver and a bright flash of blue taught me that tip. (My life will always be a bad sitcom)
Remove the faceplate and unscrew the electrical receptacle from the wall.
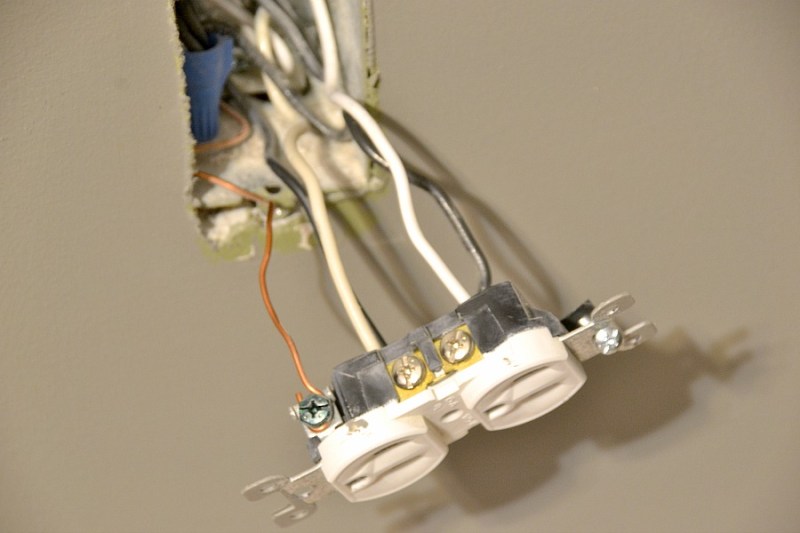
On the back of your plug, you will see a copper wire (the ground) and either one or two black and white wires. Hubby tried to explain to me why some plugs have two of each and others have one of each – something about end of the line?
Unscrew the screws and remove all the wires from the receptacle (ours required a tiny screwdriver inserted into holes in the back to release the clamp).
No matter what brand of USB receptacles you purchased, they will all require that you attach a ground wire. Wrap your copper wire around the ground, usually at the bottom of the receptacle and tighten the screw until it is firmly in place. You’ll probably find a little track that you can tuck the remaining ground wire into for ease of re-inserting it into the wall.
Make sure you have about 1/2″ of exposed wire. If not, use a wire stripper to cut a bit of the sheath back.
This part you’ll want to double-check your directions on:
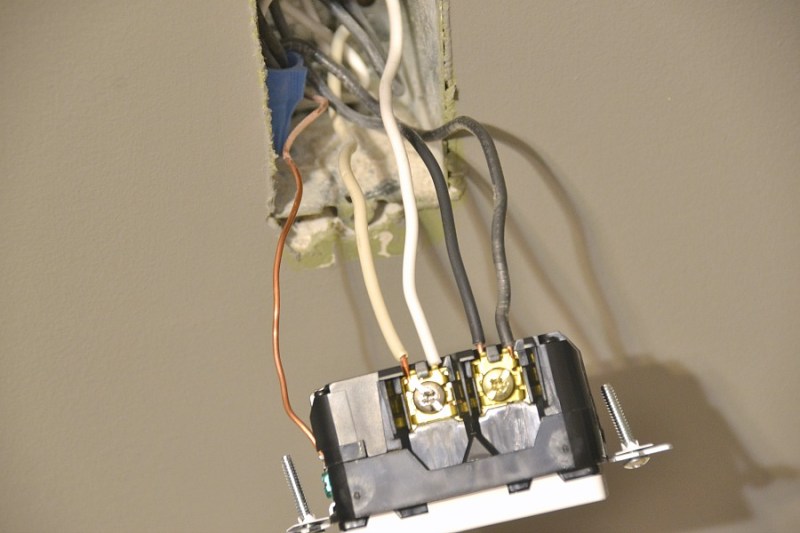
For our Leviton USB receptacles, the ground wire was at the bottom and there was a ‘TR’ at the top of the face plate (near where you screw it back into the wall). The black wire/s are inserted behind the gold plate at the TOP of the receptacle – one on either side of the screw. Tighten the screw to hold in place.
The white wire/s are inserted behind the bottom screw – see below. (The copper wire is the ground and is at the bottom of the USB receptacle. Tighten into place and you’ve done the hard parts!
Tuck your USB receptacles back into the wall, screw back into place and replace your faceplate.
Turn the power back on at the fuse box and test out your electrical work!
I won’t lie, these little babies are pricey at around $32 Cdn per receptacle – but you can find combo packs (like I did) where you can get two for $43. You probably won’t want to replace every single plug in the house, but even adding one or two here and there will help.
As for the speed of charging?
[fusion_builder_container hundred_percent=”yes” overflow=”visible”][fusion_builder_row][fusion_builder_column type=”1_1″ background_position=”left top” background_color=”” border_size=”” border_color=”” border_style=”solid” spacing=”yes” background_image=”” background_repeat=”no-repeat” padding=”” margin_top=”0px” margin_bottom=”0px” class=”” id=”” animation_type=”” animation_speed=”0.3″ animation_direction=”left” hide_on_mobile=”no” center_content=”no” min_height=”none”]
I haven’t charged my iPad from empty and timed it, but the USB receptacles I purchased run at 5 volts and 3.6 amps which – based on the chart above from Apple Inc. – lead me to believe it will charge faster than the larger iPad chargers that run at 2.1 amps.
This is just an educated guess, and I have been wrong once (or twice) before. Charging times may also fluctuate with the number of items running from that particular receptacle at any time – like if I’m charging an iPhone, iPad and have my lamp on.
Since I usually charge overnight, this wasn’t a big concern for me.
I’m not sure which I’m more pleased with – my new USB receptacles or that I tackled electricity and won! (although it was close).
I’ve attached some options below – my USB receptacles are Leviton T5632. If you don’t feel like tackling wiring yourself, and don’t mind a bulky box behind your nightstand or desk, there is a plug-in option available as well.
Anyway, after having to get some more tools to tackle this, I’ve run out of space in my current storage cabinet. Guess I’m going to have fun choosing a tool box now, haha!
Where could your home use some DIY upgrades?
Have a great one!
Linked to:
[/fusion_builder_column][/fusion_builder_row][/fusion_builder_container]


We’ve got these types in several rooms and absolutely love them. Since neither one of us was comfortable putting them in, we did have our handyman install. These are the greatest and we use them everyday and when we’ve guests it helps that now we’ve enough USB outlets. Can’t recommend these or ones similar, highly enough!
Yup, the giant blue spark suggested I should have done the same – but they really are easy if you are absolutely, positively certain that the power to that outlet is off. lol Thanks for commenting!