
I’ve done a lot of desk makeovers over the years – antique desks, peekaboo desks, secretary desks, stained finishes, painted finishes… desks are one of my favourite pieces of furniture to refinish…
but this one had me questioning the owner’s sanity.
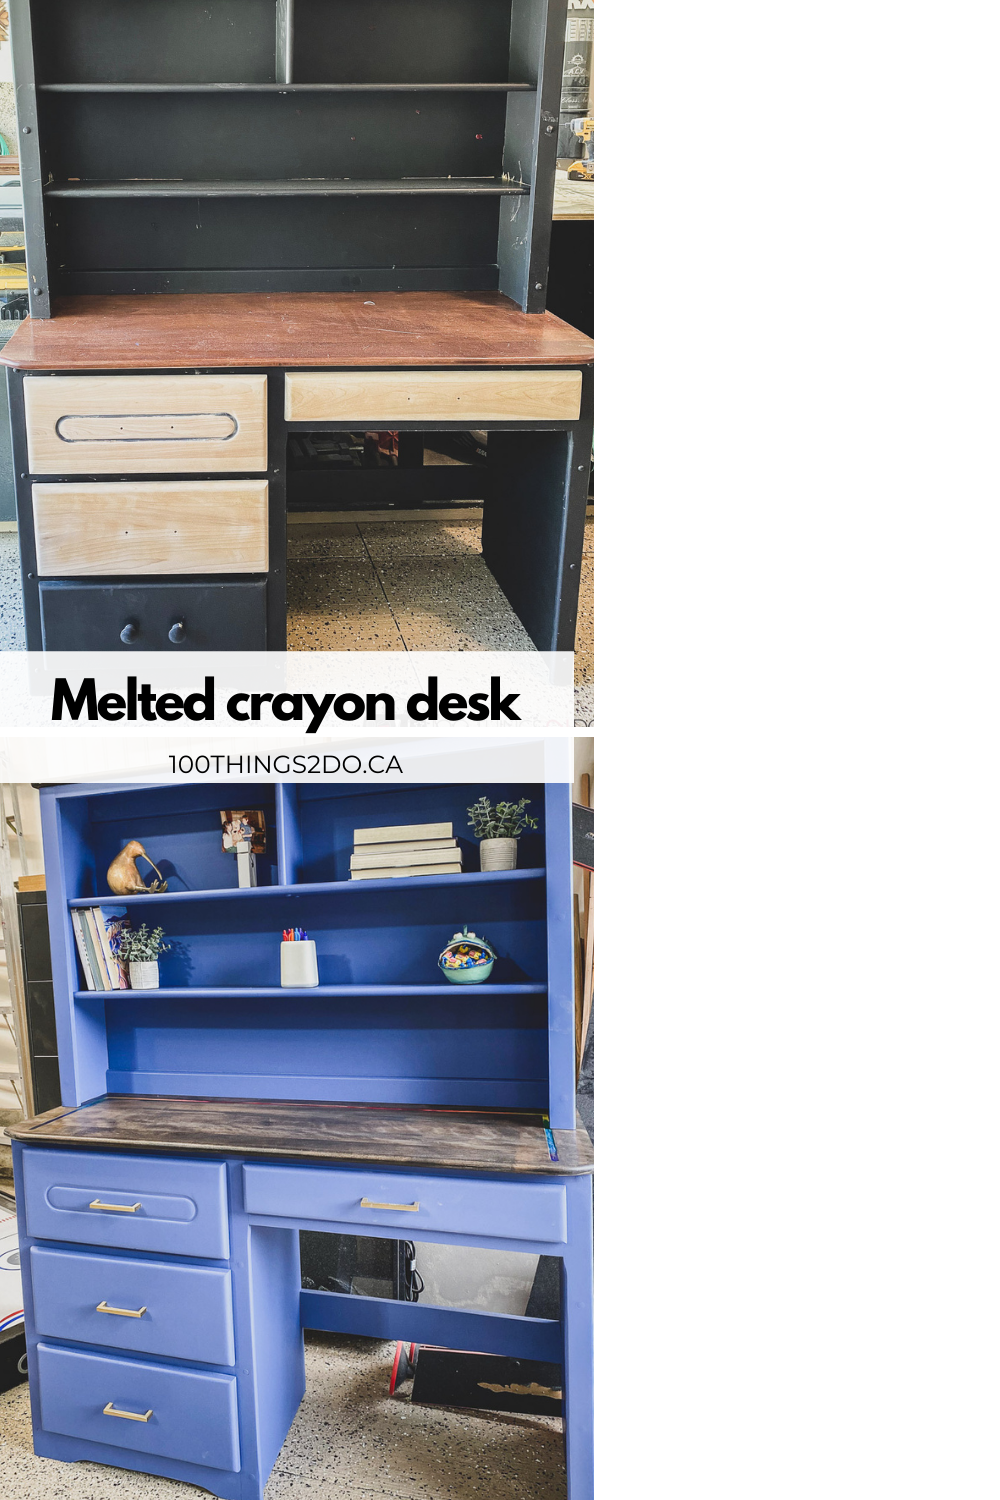
This desk was going to have a melted crayon river in the top of it and the final paint choice was a grey-purple colour.
I was skeptical, but the customer is always right, right?
This is the desk I started with:

Solid wood, which is always a treat, but in need of a clean-up and a fresh coat of something.

It had obviously been refinished before because I could see brushstrokes in the finish. There was some gum to remove and several scratches that needed filling and covering.
I’m pretty sure these knobs aren’t the original – it doesn’t make sense to me to put two giant knobs per drawer, so I think someone was trying to hide the two holes from previous handles.

I knew this melted crayon desk was only going to have a river over the working surface and not the drawers or shelves, so I started sanding there.
60 grit, 120 grit and then 220 grit on my random orbit sander and it was cleaned up and ready to go. (Amazon affiliate link, for full affiliate disclosure, please see sidebar or bottom of the page)
The body of the melted crayon desk didn’t need to be sanded down to bare wood – a light sanding at 150 grit would have been enough to smooth the lumps and bumps and create a surface that paint would adhere to easily.
But… I like sanding, and once you get started and get results like this, it’s kind of hard to stop. lol

The drawer fronts were sanded down to bare wood, but the rest of the desk was just cleaned up to a buttery smooth surface ready for primer.

Before I could get to priming though, it was time to create the river for the melted crayon to run through.
We (Chris and I) set up a jig to keep the router on-track, but clamping some scrap wood to the surface of the desk that the router could run along side of.
To do this we had to determine 1. where he wanted the river to run on the desk then, 2. the distance between the centre of the router bit and the edge of the faceplate that would run along the clamped board.

Once that was decided, and the board clamped in place, it was time to router a groove.
Those are not my manly hands – although mine are manly too 🤦🏻♀️ – this part I made Chris handle because I really didn’t want to screw up on a desk for his daughter and also because I have a healthy fear of my router.


A couple of little wiggles here and there, but overall exactly what we were hoping for; a groove deep enough to melt crayons into.
Then it was crayon time!

We peeled the crayons, broke them in half and then set the pieces in the groove to approximate where we wanted each colour.
Using a Wagner heat gun, we went over each bit of crayon until it was fully melted and slightly blending in to the next colour.

Don’t worry too much about any spills or overages – this is easily cleaned up afterwards by scraping the excess and then sanding everything smooth again.

We didn’t fill to the absolute top of the groove, knowing that a thin coat of epoxy was going to be added over top to make the surface flush and keep the melted crayons in place.
I didn’t take photos of the epoxy step, but it was much like the crayon step; pour the mixed epoxy into the groove, use a heat gun to melt any air bubbles and then scrape/sand off overages once dry.

Miss Charmaine chose a dark – almost black – stain for her desktop and the top of the hutch, and a beautiful grey-purple for the body of the desk.
I stained the desktop first and once dry, sealed it with Varathane triple-thick.

The body of the melted crayon desk was then primed with Zinsser Bullseye 1-2-3, sanded with 320 grit and then finished with the purple paint.
I swapped out the bulky (and excessive) knobs for these sleek brushed brash handles.


Absolutely perfect for a 9 year old’s bedroom right?!

I absolutely LOVE how the melted crayon river runs just inside the edges of the desk hutch.

A rainbow to admire while you’re working, without impeding on the work surface too much. So pretty! 😍


Forgive my staging, I don’t have 9 year olds at my house to have “stuff” to make the desk look age appropriate.


I was really surprised with how easy this desk makeover was – particularly the crayon melting – and the dramatic effect that one additional little detail adds to the project.
Pick up a crappy desk on Craig’s List or Kijiji and give it a whirl – you’ll be glad you tried.
Have a great one!
