So the other day you saw my throw pillow collection, or at least part of it. If you took any inspiration from my pillow collection, then you might want to have a look at somewhere like https://www.sleepjunkie.org/best-pillows/ to try and get a collection of your own up and running. Well, the other side of that problem is my throw pillow cover collection.
At roughly $30 per throw pillow, keeping up with Seasonal themes can get really expensive! But I purposely painted my house grey so that I could inject a shot of just about any colour at any time to keep things fresh and lively… so I created my middle ground.
Easy-sew throw pillow covers.
My previous tutorials on the blog show how to make envelope pillow covers, the kind that fold over each other in the back so there’s no need for zippers or buttons.
Today I’m going to show you a REALLY easy and inexpensive pillow cover that you can make in about 20 minutes…. using t-shirts!
T-shirt pillow covers
- men’s large t-shirt
- sewing machine
- snaps (the kit below is WAAAAAY beyond what you need, so these will last you through tons of projects)
- optional: heat-transfer / iron on material and a cutting machine.
I picked up a bright red and a navy t-shirt from the clearance section at Old Navy. After the Holiday sales, I managed to get these for $3.80 each! (The four-pack above come out to $4.31 each)
You’re only going to sew one straight line on these t-shirt pillow covers, so don’t panic that there is anything more involved than pressing the gas pedal on your machine.
You’ll want men’s t-shirts for this because they have more fabric. I went with men’s large to make sure I had enough fabric to cover my pillows.
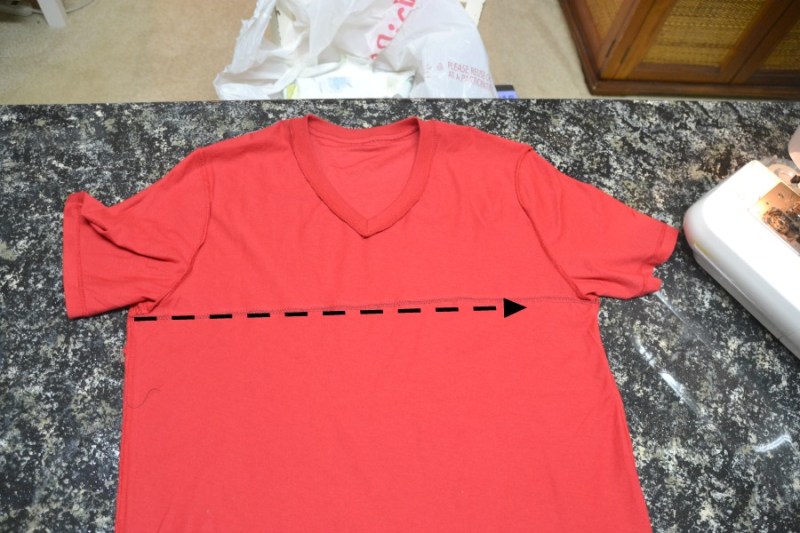
Turn your t-shirt/s inside out and stitch a straight line from the bottom of one armpit to the other.
Run a second line just above the first in a zig zag stitch; this will stop any fraying.
Sewing done!
Cut off excess from the armpits up. Feel free to keep the neck section to use as a ‘dickie’ for next Christmas (think Cousin Eddie). lol
Next you’ll want to attach snaps to the bottom hem of your t-shirt pillow. These can be picked up at any sewing store and I’m pretty sure you can find inexpensive snap kits at Wal-Mart as well.
Make sure you line up your snaps to that they’ll clip together without pulling – I suggest using 5 snaps per side. (I tried to get away with three and had to go back and add more afterwards) Place the cover of the snap (the smooth side) on the part of the shirt hem that will be the outside of your pillow cover, thread it into the female side and press together with your snap fastener. Repeat on the other hem of the t-shirt pillow cover with the smooth cover threaded into the male section, then press again.
That’s it! You’re done!
Turn your t-shirt pillow cover right-side-out, stuff with an insert or existing pillow and snap the bottom closed.
Because I wanted these for Valentine’s Day decor, I decided to get out a bit of iron-on glitter transfer and cut some Valentines-y stuff to put on my t-shirt pillow covers.
These were cut with the Silhouette Cameo onto Cricut iron-on transfer in glitter.
The best part about these t-shirt pillow covers, besides how inexpensive and easy they are to make, is that they are SO soft to lay on. Our throw pillows are actually used for movie nights and afternoon naps, so having something soft (and washable) is a real bonus.
I might need a couple more t-shirt throw pillow covers to even things out a bit more, but for today it’s time to snuggle in and test these cuties out.
Based on the Amazon links above you’re looking $4.31 per t-shirt, $0.53 for 5 snaps and $3.63 for half of the iron-on glitter transfer = $8.47 per soft, comfortable, washable and decorative t-shirt pillow cover.
Have a great one!
Linked to:


I have a t-shirt I saved from the 2016 Presidential election. My BFF wanted me to make it into a pillow for her because she loved the candidate and the shirt. It’s been sitting in my sewing room all this time because I hadn’t taken the time to figure out how to do it. Now I know and can’t wait to make it for her. Thanks so much for the tutorial! Cheryl