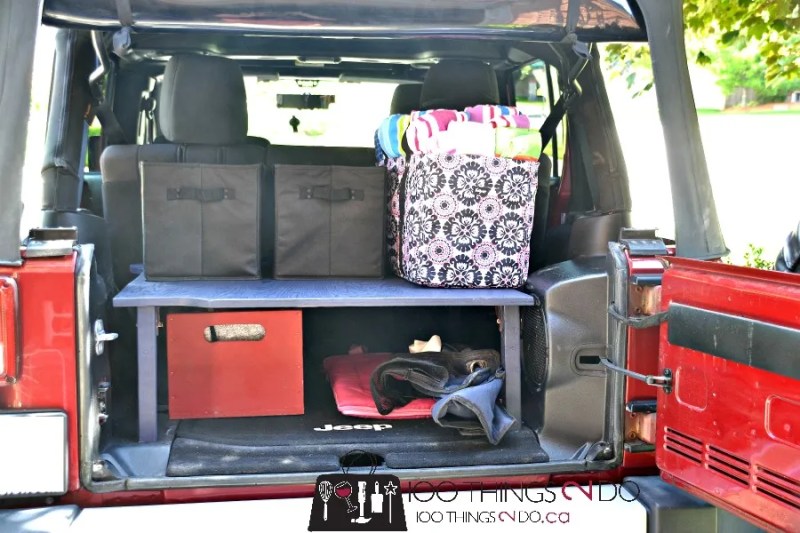
Ever since I found this pin on Pinterest, I was dying to create my own trunk organizer.
Click image or this link to be taken to original instructions.
The instructions for this are great, and the materials are inexpensive enough – but this version just didn’t work for me – I wanted a trunk organizer that was collapsible, portable and sturdy – but removable as well… without any residual marks to my car.
The great news is that my version is MUCH easier to build (although more expensive), has a more custom fit and is much sturdier than the version above.
The best part is that your car’s manufacturer has given you the template you need to create your own!
The mat that lines your trunk is an almost perfect template to trace to create your own trunk organizer! (I purposely made my trunk filthy to give the most dramatic before and after photos).
Trace out your trunk liner/mat on a piece of 3/4″ plywood. Before cutting, check to make sure that your mat covers the floor in it’s entirety – my floor had a small plastic section that wasn’t under the mat (you can see in the photo above, on the left side), so I added it onto my drawing after the fact.
Once you’re sure you’ve covered the entire floor space within your template, cut it out with a jigsaw.
Chances are your trunk organizer won’t sit completely flush with the sides of your trunk; wheel wells and speakers provide all kinds of bumps and jut-outs. Don’t worry about a flush fit on the sides – if you want your trunk organizer to be collapsible, you only have to fit the bottom of your trunk.
Next you’ll need to accommodate for the slope of the back seats. My seats took up about 2 extra inches, so I had to cut that off of the edge of my plywood – the edge that lines up with the door. Put a cooler or some bricks underneath the plywood and line it up flush with your rear seats at the height you want – you’ll easily be able to see where the wood will bump with your rear door/hatch. Measure and cut that excess off with your jig saw.
You’ll want to buy 4 folding leg brackets like these:
Cut some scrap 2×2 wood to the length you want. I went with 11 1/4″ so that the total height of my trunk organizer was 12″, but if you want to fit something specific under your shelf, you’ll need to measure for that (eg. coolers might be 18″ tall).
Attach the leg brackets to each 2×2 leg as below.
When the legs are unlocked and folded down, the 2×2 wood will fit inside the quarter circle hinge area.
You’ll want your legs to fold towards each other, and parallel to the sides of your trunk. By doing this, even when the trunk organizer is completely collapsed, you’ll still be able to access the 2″ of space underneath it to hide valuables, or store a spare blanket.
I had some navy paint leftover in the garage, so I opted to paint mine – but this could easily be upholstered in trunk-like fabric with just a staple gun. The idea is to make the trunk organizer shelf dark enough that when (bad) people peek into your car to gauge for valuables, all they will see is a dark surface and the assumption will be that it’s the bottom of an empty trunk.

This is what is underneath the above photo:
I’m able to store my car emergency kit, extra grocery bags, a picnic blanket and folding chairs easily, without taking up any room that I might need for groceries, coolers or beach gear.
This DIY trunk organizer was traced, cut, sanded, legs attached AND painted in an hour and for only $55. (you can buy cheaper plywood and build it for even less).
If you need to bring home larger items, fold the legs down and you still have (almost) as much room as before!
Custom-sized, collapsible and it will double your trunk storage capacity!
This will work with mini-vans, SUV’s, hatchbacks and of course Jeeps.
I’m so pleased with how this turned out!
Really, you could even use it as a small picnic table as well…. no ants or sand in your food. This is a winner all around!
Have a great one!
Linked to:
[/fusion_builder_column][/fusion_builder_row][/fusion_builder_container]


Awesome!! This also provides safety by covering items stowed under it.
Absolutely! Paint it black, or cover it in car upholstery fabric and no one would even know it was there! Thanks for commenting.
While I think you did great work and this is a super “invention”, there appears to be no way to use your rear view mirror (at least as the photo shows with all the suitcases). Is this correct, because the idea is a really great one if it doesn’t interfere with anything.
Well done! MMR
It’s just the angle of the photograph – none of the bags or boxes were much higher than my rear seat backs, so the rear-view was clear. The shelf itself comes up to about half the height of my/your rear seats, so it would only be what you load it with that would block your view. Thanks for the tip – readers, please don’t block the view of your rear-view mirror when loading up your new trunk organizers.
this is so smart! i love how this is collapsible, too. great job!
b
Thank you so much!