When my friend Jan approached me about refinishing her wicker patio set I was excited and nervous at the same time.
I’ve never done a wicker makeover before, and wicker furniture generally has a LOT of nooks and crannies.
Will it need stripping? If I use a paint stripper will it weaken the fibres and ruin the furniture? Will my paint sprayer be able to get into every little crevice or will I be endlessly hand painting?
But I love Jan, and I love a challenge – so I couldn’t resist trying.
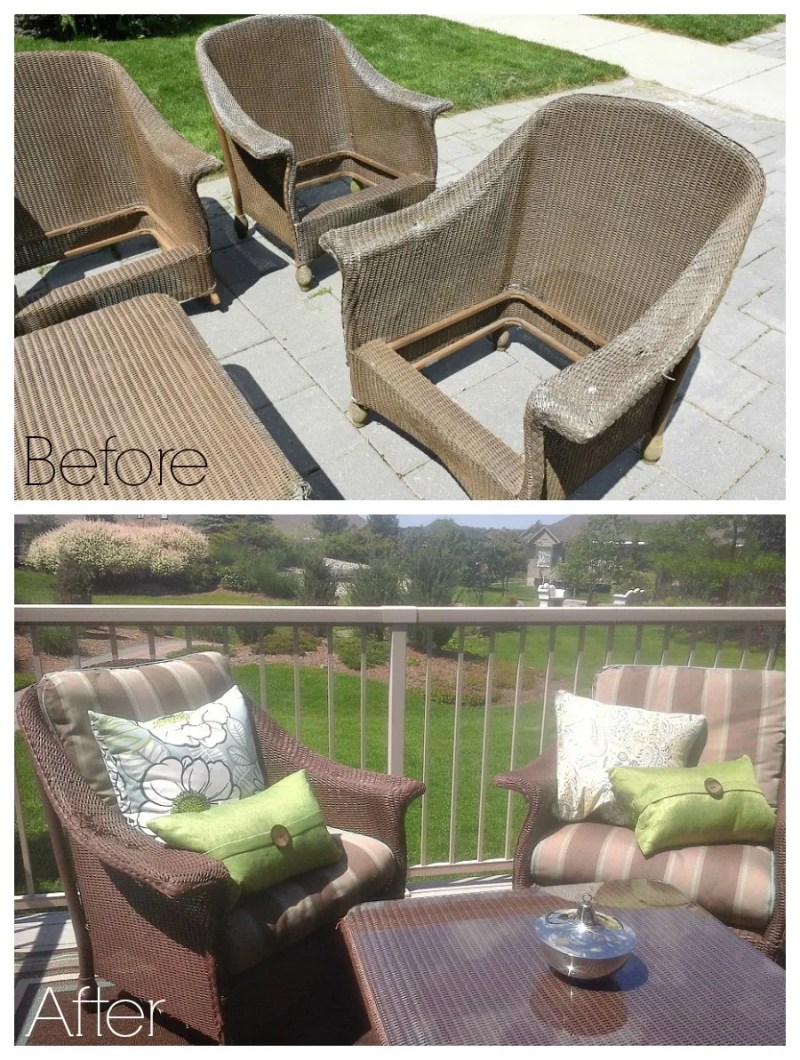
This is the before:
This is a gorgeous set – the detailing is beautiful and it’s really well made – but it has seen some weather and wear-and-tear.
I wasn’t confident enough to repair or patch the wicker, although there are tutorials available online – but you’ll see that the facelift hides a lot by itself.
I did not strip down any of these pieces, and I did not use a high-pressure pressure washer – both of these would have done more damage to the furniture. Instead, I used a low-pressure washer and some Krud Kutter® to remove mold, mildew, bird poop and dirt. An outdoor ENJO cloth helped me to get into every crevice as well as right into the fibres for a thorough clean. I left the patio set in the sun for a day to thoroughly dry out (very important).
I’ll tell you right now, if you are considering making over your wicker furniture, seriously consider buying or renting a paint sprayer. Mine is an inexpensive Wagner version and without it I don’t think I could have done this job justice. It would have taken hours of hand-painting and even then I’m not sure that I would have been able to reach everything.
I watered down my Zinsser® Bulls Eye 1-2-3® latex primer according to the paint sprayer specs and coated every square inch. The first coat I sprayed in a side-to-side pattern and let dry in the sun for 24 hours.
The second coat of Zinsser® primer I tinted slightly – to make certain that I didn’t miss any spots – and used the paint sprayer in an up-and-down pattern. Again, and because wicker is so fibrous, make sure you let each coat dry totally and completely.
Jan chose a gorgeous chocolate brown in a Behr outdoor paint and you can see here that the wicker makeover is pretty spectacular.
I painted two coats, with drying time in between, in the same side-to-side, then up-and-down pattern as I did with the primer. I do think this made a difference as it allowed me to cover just about every angle imaginable.
I almost forgot to take the “after” photo until Jan was about to load it up to take home, so I don’t have any of the patio set ‘set up’ for you.
You might be able to catch a glimpse of a fray here and there, but overall the paint hid things well, not to mention that it will add a few more years to the life of the set.
Jan sent me photos of her new and improved patio set:
Pretty impressive for my first wicker makeover EVER! (totally tooting my own horn here).
One more DIY checked of my “I wonder if I can do this?” list! Thank you Jan for trusting me.
Just in case you’re wondering – the total number of hours I spent working on this wicker makeover was 7.5. That includes the cleaning, two coats of primer and two coats of paint – it was just the drying time that stretched the project out to 4 days…
but who says you can’t sit and watch paint dry? On a sunny day with a cool beverage, it’s just about the greatest pastime of the summer!
Wicker Makeover – what I used:
Have a great one!


