
So you want to try woodworking, but you have no idea where to start?
Welcome to the club.
There was a time when I didn’t know the difference between a mitre saw and a table saw, didn’t own a workshop full of fancy tools, and certainly didn’t imagine I’d eventually go to school for cabinetmaking.
I started where most DIYers start: I wanted something for my home, didn’t want to pay a fortune for it, and thought, “I could probably make that.”
Sometimes I could.
Sometimes I really, really couldn’t.
But every project taught me something, and over the years I’ve gone from figuring things out through trial and error to receiving formal cabinetmaking training—and I’m still learning with every build.
If you’ve been scrolling through Pinterest looking at beautiful DIY furniture and thinking I’d love to make that, but I wouldn’t even know where to begin, this guide is for you.
We’re going to cover the basics of beginner woodworking: which tools you actually need, how to choose lumber, how to measure and cut accurately, sanding, joining boards, finishing your project and—most importantly—what you don’t need to spend money on when you’re just getting started.
You don’t need a $20,000 workshop.
You don’t need every tool at Home Depot.
And you definitely don’t need to know everything before you make your first sawdust.
Let’s build something.

What is woodworking, anyway?
That sounds like a ridiculous question, but I think “woodworking” can be intimidating because we picture elaborate dovetail joints, giant workshops and people who can identify a piece of walnut from 20 feet away.
That’s certainly woodworking.
But so is building a simple shelf.
Or a planter.
Or a console table.
Or turning a few pieces of inexpensive pine into something useful for your home.
For the purposes of this beginner woodworking guide, we’re talking about practical DIY woodworking: learning enough basic skills to confidently build furniture, storage and decor for your home.
You can learn the fancy stuff later.
What tools does a beginner woodworker really need?
Here’s where it’s easy to go completely off the rails.
You watch a woodworking video and suddenly you’re convinced you need a table saw, track saw, router, planer, jointer, drill press, biscuit joiner and approximately 47 clamps before you can make a wooden box.
You don’t.
Start small and buy tools as your skills—and your projects—require them.
My essential beginner woodworking tools
Amazon affiliate links to items I use and recommend.
If I were starting over today, I’d begin with:
- Tape measure
- Speed square
- Pencil
- Drill/driver
- Mitre saw or circular saw
- Random orbital sander
- A few clamps
- Safety glasses
- Hearing protection
That’s enough to make a surprising number of projects.
Tape measure
You’ll use this on virtually every project you ever build.
My biggest beginner tip?
Use the same tape measure throughout a project.
There can be tiny differences between tape measures, and tiny differences have an annoying habit of turning into larger ones once several pieces are assembled.
Also learn what all those little marks mean. You don’t want to be standing at the saw wondering whether you’ve marked ⅜” or 7/16″.
Ask me how I know.
Speed square
This inexpensive little tool helps you mark straight, square lines, check 90° corners and guide certain cuts.
For the cost, it’s one of the most useful tools you can own.
Drill/driver
You’ll use a drill constantly—for drilling pilot holes, driving screws, making pocket holes and assembling projects.
If you’re buying cordless tools, think ahead before choosing a brand. Batteries are expensive, so once you own a couple of batteries and chargers, it’s usually more economical to stay within that tool system.
What saw should a beginner woodworker buy first?
This depends on what you want to build.
Mitre saw
If your projects will mostly use dimensional lumber—1x2s, 1x4s, 2x4s, etc.—I LOVE a mitre saw for beginners.
You can make:
- Straight crosscuts
- Angled cuts
- Mitred cuts
- Repeated cuts of the same length
It’s relatively straightforward to learn and excellent for furniture building.
Circular saw
A circular saw is less expensive, portable and much more useful when you’re cutting large sheets of plywood.
Pair it with a straightedge or cutting guide and you can accomplish a lot without a table saw.
Jigsaw
I wouldn’t necessarily make this your first saw, but it is incredibly handy.
A jigsaw cuts curves, circles, notches and shapes that a mitre or circular saw can’t.
I’ve even used one to cut a circular tabletop. It wasn’t absolutely perfect straight off the saw, but sanding cleaned it up beautifully. That’s one of those lessons I wish I’d understood earlier: woodworking doesn’t require every cut to emerge from the saw absolutely perfect. Sometimes the next step fixes the previous one.
Do beginners need a table saw?
No.
Do I love mine?
Absolutely.
A table saw opens up a whole new world because you can rip boards to custom widths, cut sheet goods and make more advanced joinery.
But it also requires a healthy respect and an understanding of how to operate it safely.
Learn the basics first. You can always add one later.
The beginner woodworking tool nobody tells you about: clamps
Eventually you’ll discover one of woodworking’s great mysteries:
No matter how many clamps you own, you never seem to have enough clamps.
Clamps hold pieces in position while you assemble them and provide the pressure wood glue needs while it cures.
You absolutely do NOT need to buy an enormous clamp collection when you’re starting.
I’d begin with pairs of a few useful sizes and add to your collection as you discover what you actually need.
I have an entire article explaining What clamps you need for woodworking and the different sizes and types worth buying. When I researched that article, the professional recommendation for a home DIYer was to gradually build a collection with pairs of useful sizes rather than immediately investing hundreds of dollars in a giant set.
You need a sander
Technically you can sand everything by hand.
You can also wash your clothes in a river.
I’m not doing either.
For beginner woodworking, I’d invest in a random orbital sander, but my DIYers guide to sanders will help you decide what you need based on the projects you hope to build.
You’ll use it to:
- Smooth rough lumber
- Even imperfect joints
- Remove scratches
- Prepare wood for stain or paint
- Smooth wood filler
- Sand between finish coats
A good sander can make inexpensive lumber look dramatically better.
I’ve built projects from rough pine and taken boards from decidedly unimpressive to gorgeous simply by working through the sanding process.
Understanding sandpaper grit
Sandpaper numbers tell you how coarse or fine the abrasive is.
Lower number = rougher.
Higher number = finer.
A simple beginner guideline:
| Grit | What I use it for |
|---|---|
| 60–80 | Heavy material removal, rough lumber |
| 100–120 | General smoothing |
| 150–180 | Preparing for many finishes |
| 220 | Fine finishing |
| 320+ | Light sanding between finish coats |
You don’t necessarily need to start at 60 grit every time.
If your wood is already relatively smooth, starting at 120 may be perfectly adequate.
And don’t skip straight from extremely coarse sandpaper to very fine sandpaper. Each grit removes the scratches left by the grit before it.
How to choose wood for your first project
Walking into the lumber aisle for the first time can be overwhelming.
Pine?
Spruce?
Poplar?
Oak?
Plywood?
And why is a 2×4 not actually 2″ by 4″?
Welcome to lumber.
Start with dimensional lumber
For your first few projects, dimensional lumber is your friend.
Those are the boards labelled things like:
- 1×2
- 1×3
- 1×4
- 1×6
- 2×2
- 2×4
Keep in mind those are nominal dimensions, not the actual finished measurements.
For example, a 1×6 is generally about ¾” thick by 5½” wide.
That matters enormously when you’re calculating project dimensions.

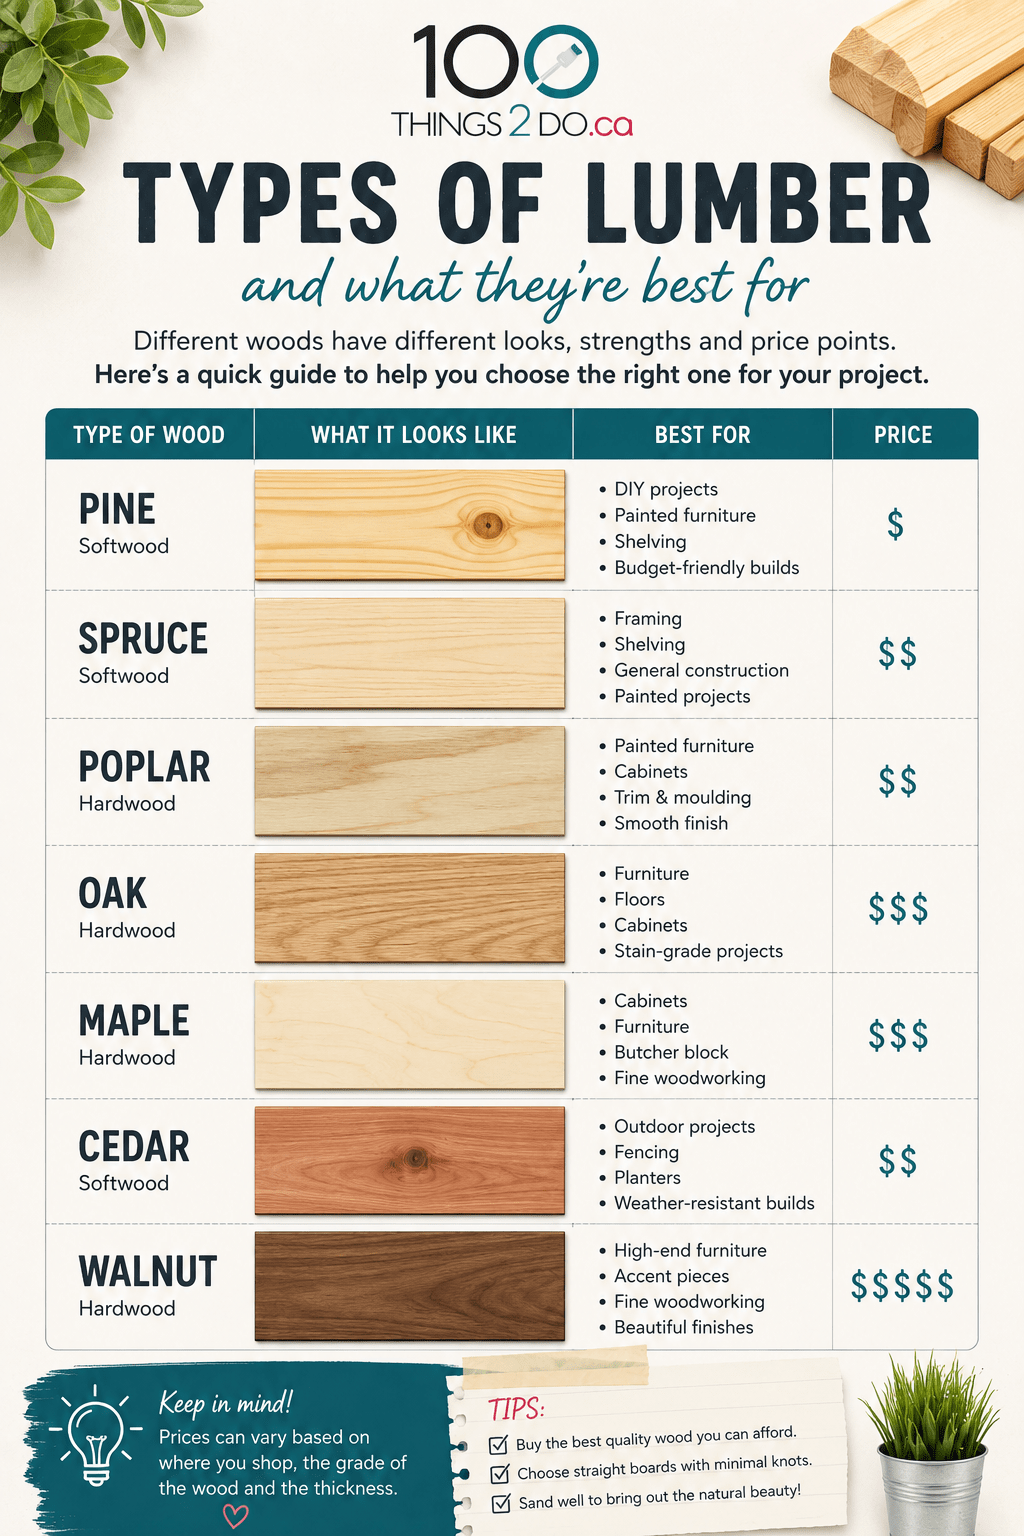
Pine and spruce
They’re affordable, readily available and relatively easy to work with.
That’s why you’ll see me use them in so many DIY projects.
The downside is that they’re soft, so they dent relatively easily, and some boards can twist or warp.
Poplar
Poplar is a lovely option for painted furniture.
It’s smoother and generally more stable than inexpensive construction lumber, but you’ll pay more for it.
Hardwood
Oak, maple, walnut and other hardwoods can produce gorgeous furniture.
They also cost considerably more.
Learn on inexpensive wood.
There is nothing quite like the terror of making your first questionable cut into a $100 piece of walnut.
How to choose straight lumber
This one will save you SO much frustration.
Don’t just grab the first six boards from the pile.
Take each board and sight down its length.
Look for:
- Bowing
- Cupping
- Twisting
- Warping
- Major cracks
- Loose knots
- Damage
Put the bananas back.
You’re going to have enough challenges getting your first project square without starting with lumber shaped like a rainbow.
What about plywood?
Plywood is fantastic for larger furniture pieces, cabinets, shelves and storage projects.
It’s sold in sheets, commonly 4′ x 8′, and comes in different thicknesses and grades.

I’ve used ¾” plywood for everything from small organizers to substantial furniture. Truth be told, I overbuilt many, MANY times. This is a much better guide (that will save you money) as to what thickness to use when:

You don’t necessarily need a table saw to work with plywood.
A circular saw with a straightedge works, and many home-improvement stores will make basic sheet cuts for you.
Measure twice, cut once
Yes, it’s a cliché.
It’s also cheaper than buying another board.
Before cutting:
- Read your project plans completely.
- Confirm your measurements.
- Mark your cut.
- Use a square to make a clear line.
- Double-check which side of the line is waste.
- THEN cut.
And learn about kerf.
Kerf is the thickness of the blade and therefore the amount the blade will take up from your wood. Kerf is usually 1/8″ so when cutting you don’t cut directly ON your marking; you cut to the left or right of it so the your finished piece isn’t missing that 1/8″.
The saw blade itself removes material. If you cut directly through the wrong side of your measurement line, your finished piece can be slightly shorter than intended.
A sixteenth of an inch doesn’t sound important until four slightly-wrong pieces are supposed to form a perfectly square rectangle.
How do you join two pieces of wood together?
There are dozens of woodworking joints.
As a beginner, you really only need to understand a few methods.
Screws
Simple, strong and inexpensive.
Pre-drilling a pilot hole can help prevent wood from splitting, particularly near the end of a board.
Wood glue
Do not underestimate wood glue.
A properly prepared and clamped glue joint is incredibly strong. In fact, I learned in trade school (Cabinet making) that glue is actually STRONGER than nails or screws. It’s true! The teacher slammed a board down that had nails screws and (cured) glue and the seams broke at the nail points, and the screw points – but not the glued edges.
Apply an appropriate amount, clamp the pieces together and wipe away squeeze-out before it becomes tomorrow’s sanding problem.
Pocket holes
I use pocket holes all the time in DIY furniture.
A pocket-hole jig lets you drill an angled hole so a screw pulls two pieces tightly together. The fastener can often be positioned where it won’t be visible on the finished piece.
They’re fantastic for beginners because they’re relatively easy to master and allow you to build strong projects without learning complicated traditional joinery immediately.
Many of my builds use a combination of wood glue + pocket-hole screws, including my four-board console table.
Square is your friend
If you’re making a box, table, cabinet or frame, check for square before the glue dries.
Use a speed square or framing square at the corners.
For larger rectangular assemblies, measure diagonally from corner to corner.
Then measure the opposite diagonal.
If the measurements match, congratulations—you’re square.
If they don’t, adjust the assembly while you still can.
Future You will be very grateful.
Sand before you assemble
This isn’t always possible, but it’s one of my favourite woodworking shortcuts.
If I know an area is going to be difficult to reach once the project is assembled, I sand it first.
I’ve done this on several builds because trying to maneuver an orbital sander into a tiny inside corner after assembly is an exercise in frustration.
You’ll probably still do a final sanding after assembly, but pre-sanding can make life much easier.
Wood filler: your new best friend
Tiny gap?
Wood filler.
Nail hole?
Wood filler.
Slightly imperfect joint?
Wood filler.
The project you built at 11 p.m. after announcing “I’ll just make ONE more cut”?
Wood filler.
Apply it, let it dry completely and sand it flush.
Woodworking is not about never making mistakes.
It’s about getting increasingly good at making them disappear. “Do your best then caulk the rest”
Paint, stain or natural wood?
You built it!
Now you need to decide how to finish it.
Paint
Paint is forgiving and fantastic for inexpensive lumber and MDF (Medium Density Fibreboard).
Fill your holes, sand thoroughly, prime when appropriate and apply your paint in thin, smooth coats.
Stain
Stain lets the wood grain show through.
Your sanding becomes especially important because scratches and uneven sanding can become more noticeable once stain is applied.
Always test your stain on a scrap from the same wood you’re using for the project.
Clear finish
A clear topcoat protects wood from moisture, stains and wear.
The right finish depends on the project, the underlying paint/stain and how much abuse the piece will receive.
I’ve written a much more detailed guide to Refinishing wood furniture, including painting, staining and protective finishes. Another great article is 15 Things to know before refinishing furniture.
How much does it cost to start woodworking?
This varies wildly—which is why I don’t want to give you a fake “$237 beginner workshop” number.
You could spend thousands.
Please don’t.
If you’re starting from zero, buy the basic hand tools and then add power tools as projects require them.
Look for:
- Sales
- Factory-refurbished tools
- Secondhand tools
- Marketplace finds
- Tool bundles
- Borrowed tools
- Scrap lumber
And save your offcuts!
Once you start woodworking, a 14″ piece of 1×4 is no longer garbage.
It’s inventory.
I have built useful projects from scraps that cost me essentially nothing in new materials; my simple step stool, for example, was built entirely from scrap wood and leftover finishes. Check out these 20 scrap wood gift ideas.
Do I need a workshop?
Nope.
A garage is wonderful.
A basement can work.
A driveway can work.
A couple of sawhorses and a sheet of plywood can become a temporary workbench.
What you need is a stable working surface, adequate ventilation where appropriate, decent lighting and enough room to use your tools safely.
As your collection grows, organization becomes more important. I’ve even built a portable tool rack from pegboard and lumber to keep frequently used tools accessible rather than creating an expensive fitted workshop.
And when your clamps inevitably multiply while you’re sleeping: DIY Clamp Rack From Scrap Wood
Woodworking safety for beginners
I’m going to put my serious pants on for a minute.
Power tools deserve respect.
Before using any tool:
- Read the manufacturer’s instructions.
- Understand what the tool is designed to do.
- Wear appropriate eye and hearing protection.
- Use dust collection or respiratory protection where appropriate.
- Secure loose clothing, jewellery and long hair.
- Make sure your workpiece is properly supported.
- Keep hands away from blades and cutters.
- Never remove or defeat safety guards.
- Disconnect power/remove the battery before changing blades or making certain adjustments.
- Don’t use power tools when you’re overtired, distracted or rushing.
And if a cut feels sketchy?
Stop.
There is almost always another way to make it.
No DIY project is worth an injury.
What should a beginner woodworker build first?
Choose something small, inexpensive and useful.
Your first project should teach you skills without requiring absolute precision across 47 different components.
Good beginner projects include:
1. A simple tray or caddy
You’ll learn measuring, straight cuts, assembly and finishing.
2. A basic shelf
You’ll practice measuring, cutting, sanding and installation.
3. A simple console table
Once you’re comfortable making cuts, something like my four-board console table introduces pocket holes and angled cuts without requiring dozens of components.
4. A simple step stool
My step stool uses basic cuts, pocket holes, glue and sanding and can even be made without a pocket-hole jig by using conventional wood screws.
5. A small side table
A small furniture build starts teaching you how frames, tops and supports work together.
My rustic industrial side table is a good next step once you’re comfortable with basic assembly.
Beginner woodworking mistakes I’ve made so you don’t have to
This may be the most important section of this entire article.
Buying warped lumber
You cannot easily build square furniture from crooked wood.
Check every board before buying.
Cutting everything before checking the fit
Plans are wonderful.
Reality occasionally disagrees with them.
Cut major pieces first, dry-fit where appropriate, and confirm measurements before cutting components whose dimensions depend on the assembly.
Forgetting which side gets the pocket holes
Hold the pieces together the way they’ll appear in the finished project before drilling.
Ask yourself:
Where will I see this hole when the project is finished?
I’ve learned this one repeatedly.
Not accounting for the saw blade
Remember the kerf. The blade eats approximately 1/8″ of wood.
Rushing sanding
You will regret it when the finish goes on.
Using too much glue
More glue does not equal more strength.
It equals more squeeze-out.
Not wiping away glue
Stain does not penetrate dried wood glue properly, leaving obvious light patches.
Clean squeeze-out while you can.
Once the glue has dried, use a scraper to get excess beads off before you sand. Getting the hardest bits off will save your sander a lot of wear and tear.
Not checking for square
Check early.
Check again.
And then check once more before the glue sets.
Using a speed square is good. Measuring from outer corner to outer corner diagonally is even better. Think of an X: if the distance on \ is the same as the distance on /, then you know you’re perfectly square.
Trying to hide mistakes instead of fixing them
Sometimes filler is appropriate.
Sometimes you need to remake the board.
Learning the difference is part of becoming a woodworker.
Troubleshooting common beginner woodworking problems
Why won’t my boards line up?
Check for warped lumber, inaccurate cuts, uneven clamping or an assembly that’s out of square.
Why are my screws splitting the wood?
You may be too close to the end of the board (don’t drill within an inch of the end of a board), using an inappropriate screw or skipping a pilot hole.
Why are my joints uneven?
Make sure your boards are clamped securely before fastening and that you’re working on a flat surface.
Why does my stain look blotchy?
Some woods absorb stain unevenly. Proper sanding and, depending on the wood and finish system, appropriate pre-stain preparation can help. Always test on scrap first.
Why can I still see sanding scratches?
You may have started too aggressively or jumped too far between grits. Go back a grit and work progressively finer. The finer grits will remove the swirls from the previous grit.
Why does my painted furniture look homemade?
Usually it’s the preparation rather than the paint.
Fill. Sand. Prime when needed. Sand again where appropriate. Apply thin coats.
A beautiful finish begins before you open the paint can.
Beginner Woodworking FAQ
Is woodworking hard to learn?
The basics aren’t.
Like any skill, woodworking becomes easier with practice. Start with simple projects that teach one or two new skills rather than attempting an elaborate piece of furniture immediately.
Can I learn woodworking without taking a class?
Absolutely.
I did for years.
Formal training eventually taught me techniques and theory I hadn’t picked up on my own, but you don’t need woodworking school to build useful, beautiful projects for your home.
What is the best wood for beginner woodworking?
Affordable pine or spruce is a good place to begin for many DIY projects. Poplar is an excellent choice for painted furniture if your budget allows.
What power tool should I buy first?
For furniture projects using dimensional lumber, I’d choose a mitre saw. If you expect to work primarily with plywood or need portability, consider a circular saw.
Either way, I’d put a drill/driver and random orbital sander very high on the list.
Do I need a pocket-hole jig?
No.
But for DIY furniture building, I think it’s one of the most beginner-friendly ways to create strong, discreet joints. Fortunately Kreg (the first pocket hole jig company) has come up with newer and newer models, so there are likely a LOT of older versions (that work perfectly well) available used.
Can I woodwork in a small space?
Yes.
You don’t need a permanent workshop. Portable tools, folding work surfaces and thoughtful storage can make a small garage or multipurpose space perfectly usable.
Do better as you get better. One of your projects might be building your own workbench. It was one of the first projects I did years ago – with my Dad’s help because I didn’t have confidence then – and I still use it everyday.
Is woodworking expensive?
It certainly can be, but it doesn’t have to be.
Start with a few versatile tools, use inexpensive lumber while learning, save your scraps and add equipment only when your projects actually require it.
The most important beginner woodworking advice I can give you
Build something.
Seriously.
You can watch 100 videos about making a perfectly square box and you’ll learn something from every one of them.
But you’ll learn more when you actually try to make the box.
Your first project probably won’t be perfect.
Neither will your fifth.
I’ve been building and refinishing furniture for years, I’ve gone to school for cabinetmaking, and I still always occasionally finish something and think:
Well… that’s not how I thought THAT was going to go.
That’s woodworking.
Each project gives you another skill. Eventually you stop wondering whether you could build something and start figuring out how you’re going to build it.
And that is when woodworking gets really fun.
So pick an easy project.
Buy some inexpensive lumber.
Make some sawdust.
You’ve got this.
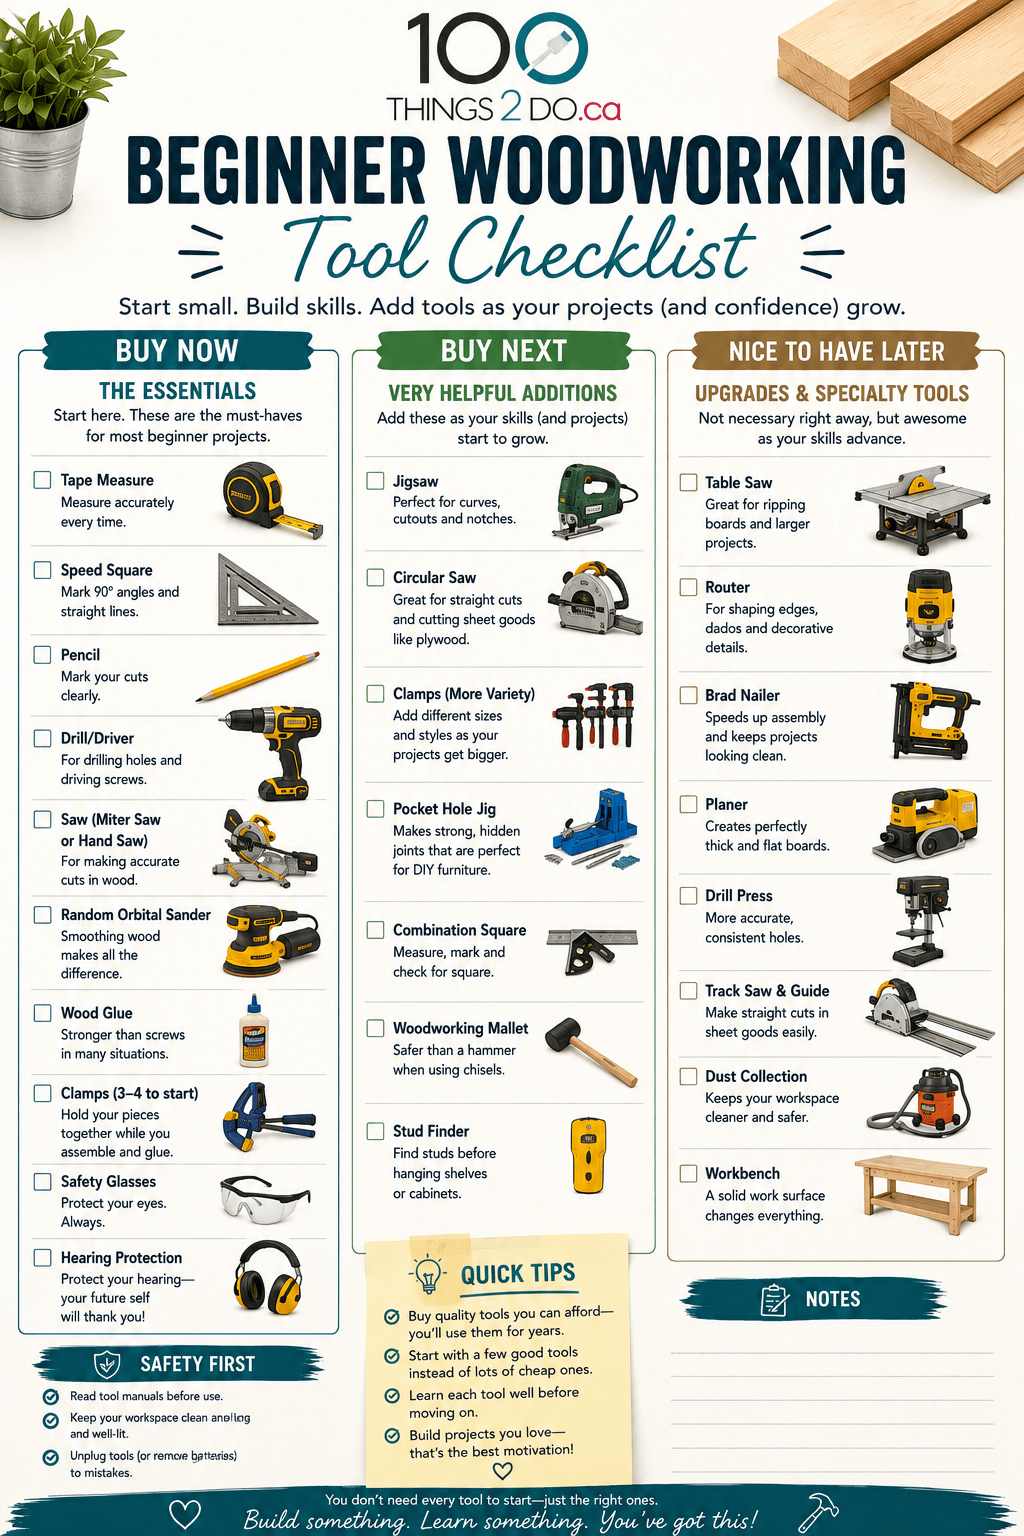
Free Beginner Woodworking Tool Checklist
Keep it on your phone or print it before heading to the hardware store. I’ve broken the list into Buy Now, Buy Next and Nice to Have Later so you don’t spend a fortune on tools you don’t need yet.
Not all tools are created equal
This infographic is a generalization as to the durability and reliability of each brand of tool. Having written that, I have a Ryobi jigsaw, a Porter Cable brad nailer, and I use Rigid drill bits. All get the job done.

My suggestion would be to buy the best that you can afford and based on how much woodworking you think you’ll do. If it’s an occasional hobby, maybe Ryobi will work for everything on your Wishlist. If you plan on growing your skills and increasing your project difficulty, then a better grade tool will last you longer.
Some of these rankings are controversial… I’m a DeWalt lover and have had (mostly) good experiences with them. Another contractor, or carpenter may tell you that Bosch or Makita is the best on the market.
More beginner woodworking projects and resources
These are a mixture of education + easy projects + workshop organization, which will help you as you progress through your learning.
100T2Do LINKS: